Huawei negotiates with Qualcomm, Huawei is more emboldened than Apple

According to the Hong Kong Science and Technology Information website Unwire reported on May 7, on the morning of the 2nd of this month, Qualcomm published the second quarter of this year’s financial report, but the company’s CEO Steve Morenkopf did not disclose Apple’s specific compensation, only said that It will receive a patent fee income of 4.5 billion to 4.7 billion US dollars (1 US dollar is equivalent to 6.8 yuan – this net note).

The patent litigation between Apple and Qualcomm has taken more than two years. However, on April 17 this year, the two parties suddenly announced a settlement on all litigations around the world. Apple agreed to pay Qualcomm a patent license fee. The two companies reached a six-year patent licensing agreement, effective April 1, including an extension of the two-year option. In addition, the two sides also reached a multi-year chip purchase agreement.

The industry and the media have said that the reconciliation between Apple and Qualcomm has accelerated the reconciliation between Huawei and Qualcomm. Reuters reported on May 2 that Qualcomm executives said that the settlement agreement with Apple will enhance Qualcomm’s ability to handle patent disputes with Huawei.

It is reported that Apple and Huawei have been involved in patent litigation with Qualcomm earlier. After Apple and Qualcomm’s patent disputes were in full swing, in April 2017, Huawei stopped paying patent fees to Qualcomm and became the second patent authorized customer to refuse to pay Qualcomm patent fees. Previously, Huawei was one of Qualcomm’s largest patent licenses. According to statistics, the patent fee from Huawei accounts for 5% to 10% of Qualcomm’s patent fees.

Earlier, the US Electronic Design website reported on May 2 that Huawei had reached a temporary patent fee agreement with Qualcomm on December 30 last year. In the next three quarters, Huawei will pay Qualcomm 1.5 per quarter. A patent fee of US$100 million. In the past, Huawei paid $100 million per quarter. The news was confirmed in Qualcomm’s latest earnings report, which mentioned that “the company received $150 million in royalties from Huawei this quarter, and negotiations with Huawei are continuing.”

However, there is news that Huawei’s patent fees are less than Apple’s settlement. The analysis believes that Huawei is already in the communication technology field and base station technology field, so it is more reasonable to negotiate with Qualcomm. Patent fee standard. In particular, in 5G technology, Huawei can significantly reduce the core licensing patent fees through cross-licensing with Qualcomm. Qualcomm CEO Morankopf also said that the real competition of 5G technology is how to reduce the price of 5G technology devices, and many people think that Qualcomm may change the current patent charging model to enhance competitiveness.

Windows 10 system how to wake up without a password

In the process of using Windows 10, if the computer wakes up from sleep or standby, it is often necessary to enter a password. If you do not need a password to wake up, you can use the following two methods to solve.

1. Use the new Windows 10 “Settings”

For the Windows 10 version that has been updated for the anniversary, the process of re-entering the password when waking up is cancelled.
Press the Win+I key combination to launch the System Settings window and click on the “Account” option.
In the Accounts window settings list, select Login Options.

Go to the “Login Options” settings page and select the “Never” command in the “When you are awakened from sleep mode” login option box.

2. Solve with traditional control commands

If you use other versions of Windows 10, it is not convenient to enter the settings through the interface. You can also use the following methods to set them.


Press the Win+R key combination to start the run window, enter the following command in the “Open” input box and press Enter:

Control.exe /name Microsoft.PowerOptions /page pageGlobalSettings

In the system setup window that is subsequently launched, you can see the option “No password required” when waking up, but the item may be gray and not selectable. In this case, select the blue “Change the currently unavailable settings” blue text link.
Then, when “No password required” becomes optional, click the item and click the “Save Changes” button.

If you do not want to use the above long command string, you can also go to the above setting window through the graphical interface along the path of “Control Panel → All Control Panel Items → Power Options → System Settings”.

Bar code scanner daily cleaning and maintenance method

First, before cleaning, the bar code scanner lens lock (also known as the safety lock) should be turned to the locked position to avoid damage to the optical components of the bar code scanner during the cleaning process. Then prepare the necessary tools: a few pieces of dry soft cotton, a balloon, a tiger, a cotton, water, a glass cleaner, a lubricant, and so on. The specific operations are as follows:
Cleaning the outer casing
We all have the experience that when you wipe the surface of a lot of dust directly with a damp cloth, the surface will be very flowery. Therefore, it is best to remove the floating ash covered by the barcode scanner housing with a dry soft cotton cloth, and then wipe it again with a damp cloth, so that the dust can be basically “killed”. If there are some other stains left on the outer casing, we can remove some washing powder on the damp cloth. After cleaning, use a clean, damp cloth to wipe the place where the detergent is rubbed several times.
When cleaning the outer casing, we should be careful not to touch the glass plate of the barcode scanner. At the same time, we should wring the wet cloth as much as possible to avoid the dirty water flowing out of the dirty flat glass during the wiping process.
2. Cleaning the glass plate
After the outer casing is basically dry, open the top cover of the barcode scanner and blow it with a blown balloon to the flat glass to “run away” the dust attached to the surface. For stains that cannot be blown away, use a glass cleaner to clean them, then wipe them off with a soft, dry cotton cloth. Since the cleanness of the glass panel is directly related to the scanning quality of the image, we must be careful when cleaning the panel.
3. Cleaning the internal optical components
Next we can open the flat glass of the barcode scanner and clean the optical components inside the barcode scanner. In general, the frame and base of the barcode scanner are carded together, so they can be easily removed without a screwdriver. In the optical components, we should focus on the bar code scanner fluorescent tube: use a cotton wool ball to pour distilled water, and then squeeze the water on the cotton ball (to ensure that no water will flow out during the wiping process), gently Wipe back and forth on the tube. Due to the precision of the optical components, when cleaning these devices, the action is light and stable.
4. Cleaning the transmission
The slider on the bar code scanner drive is another important point for us to pay attention to. Usually when the bar code scanner is noisy during operation, it is likely to be a problem with the slider. At this point we can find some lubricant evenly applied to the sliding rod to improve the mechanical lubrication of the transmission mechanism.

How can I clean the inside of the printer?

Turn off the printer’s power switch, then unplug the printer.
Open the front cover of the printer by pressing the front cover release button.
Take out the drum unit and toner cartridge assembly. When you have just used the printer, some parts inside the printer will be hot. …
Wipe the laser glass with a dry, soft cloth.
Put the drum unit and toner cartridge assembly into the printer.
Close the front cover of the printer.
Plug the printer’s power cord back in, and turn on the printer’s power switch.

Thermal transfer barcode printer head maintenance knowledge

In the maintenance mode of the thermal transfer barcode printer head, the quality of the print medium is particularly important. In order to save money, some enterprise users use low-cost thermal paper or ribbon, but the price is not always good, and the inferior print media will speed up the damage of the print head. Therefore, enterprise users should give priority to brand-printing consumables with the smooth surface and excellent texture to prolong the service life and print quality of the print head. To get the best out of it, clean the bar code printhead every time you use a roll of ribbon or a roll of thermal paper. Be careful to prevent hard objects from scratching the bar code printhead when cleaning the bar code printhead, and use a grounded metal strap or anti-static pad to prevent static damage to the bar code printhead.

When there are inconsistencies in the printout of blank dots/lines in the bar code or graphics, there may be dirt on the printhead that needs cleaning. For best results, the thermal transfer barcode printhead should be cleaned regularly before loading a new roll of ribbon tape, hot transfer printer media, or printing over 150 meters of continuous or folded print media. It is not required to turn off the power when cleaning the print head.

In addition, business users should pay special attention to the use of “professional cleaning solvents” or choose to use “printer cleaning film” to clean and maintain the print head to avoid unnecessary damage caused by dust contamination on the surface of the print head. Thermal Transfer Barcode Printhead Film is a special film that removes dirt deposits from the printhead without damaging the printhead. There are many advantages to using a rescue printhead to clean the film: in addition to extending the life of the printhead, it also reduces the downtime required for maintenance and saves the cost of replacing the printhead. Therefore, it is an economical, convenient and quick way to remove dirt and dirt without the need to remove the print head.

How to properly remove a printer on Windows 10

Although on Windows 10, the process to install printers has improved over the years, we’re quickly moving into a digital world that has significantly reduced the need to print content on paper.

If you’re also taking the paperless route, you simply no longer use a particular printer, or you’re troubleshooting problems, you can use the Settings app, Control Panel, Print Management, Command Prompt, or even PowerShell to remove the printing device from your computer.

In this Windows 10 guide, we’ll walk you through five different ways to properly remove a printer from your device.

  • How to uninstall a printer using Settings
  • How to uninstall a printer using Control Panel
  • How to uninstall a printer using Print Management
  • How to uninstall a printer using Command Prompt
  • How to uninstall a printer using PowerShell

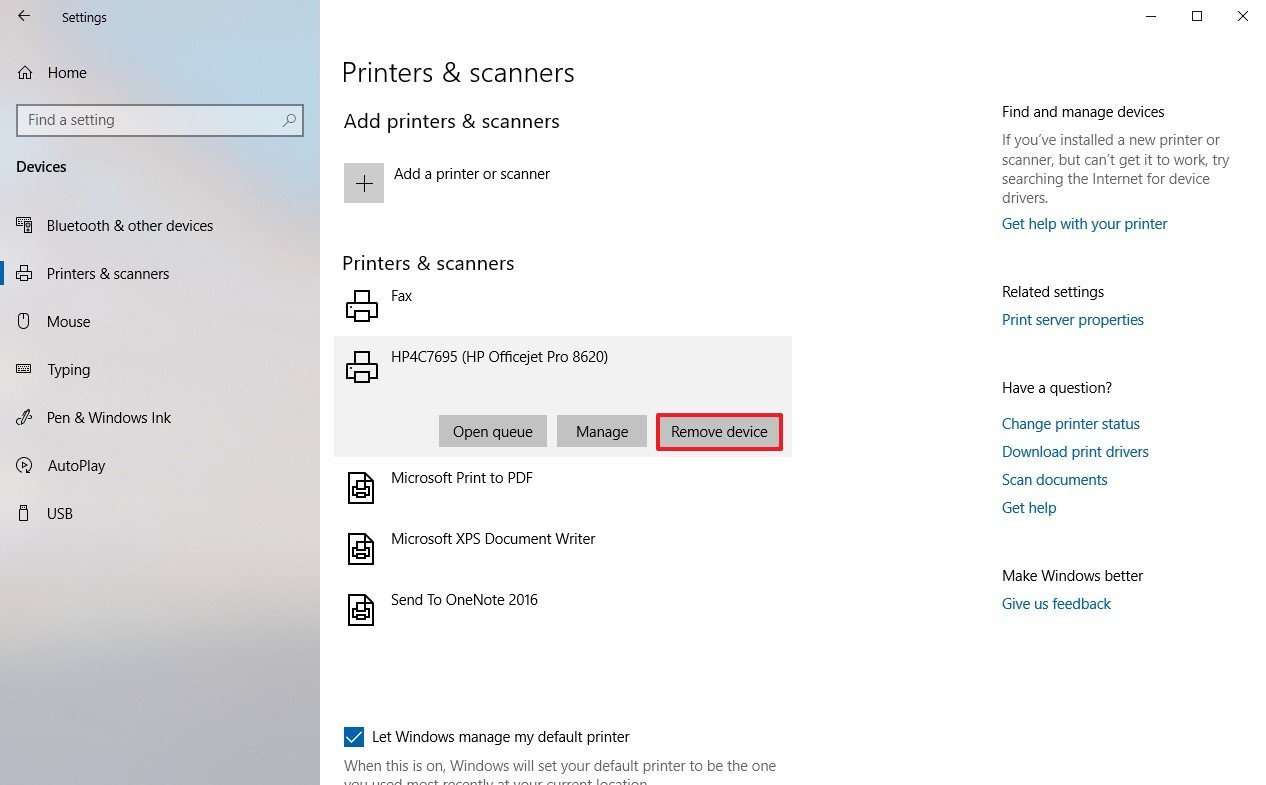
How to uninstall a printer using Settings

If you’re no longer using a particular printer, you can uninstall the device using these steps:

  1. Open Settings.
  2. Click on Devices.
  3. Click on Printers & scanners.
  4. Select the printer and click the Remove device button.

  5. Click the Yes button to confirm.

Once you’ve completed the steps, the printer will be removed from your device.

Uninstalling printer software

If you’re only using the printer with the basic driver, there’s nothing else to remove. However, if you’re using a third-party utility, or if the Settings app also installed additional tools to manage the printer automatically, you’ll need to remove the remaining software manually.

To remove left behind printer-related applications, use these steps:

  1. Open Settings.
  2. Click on Apps.
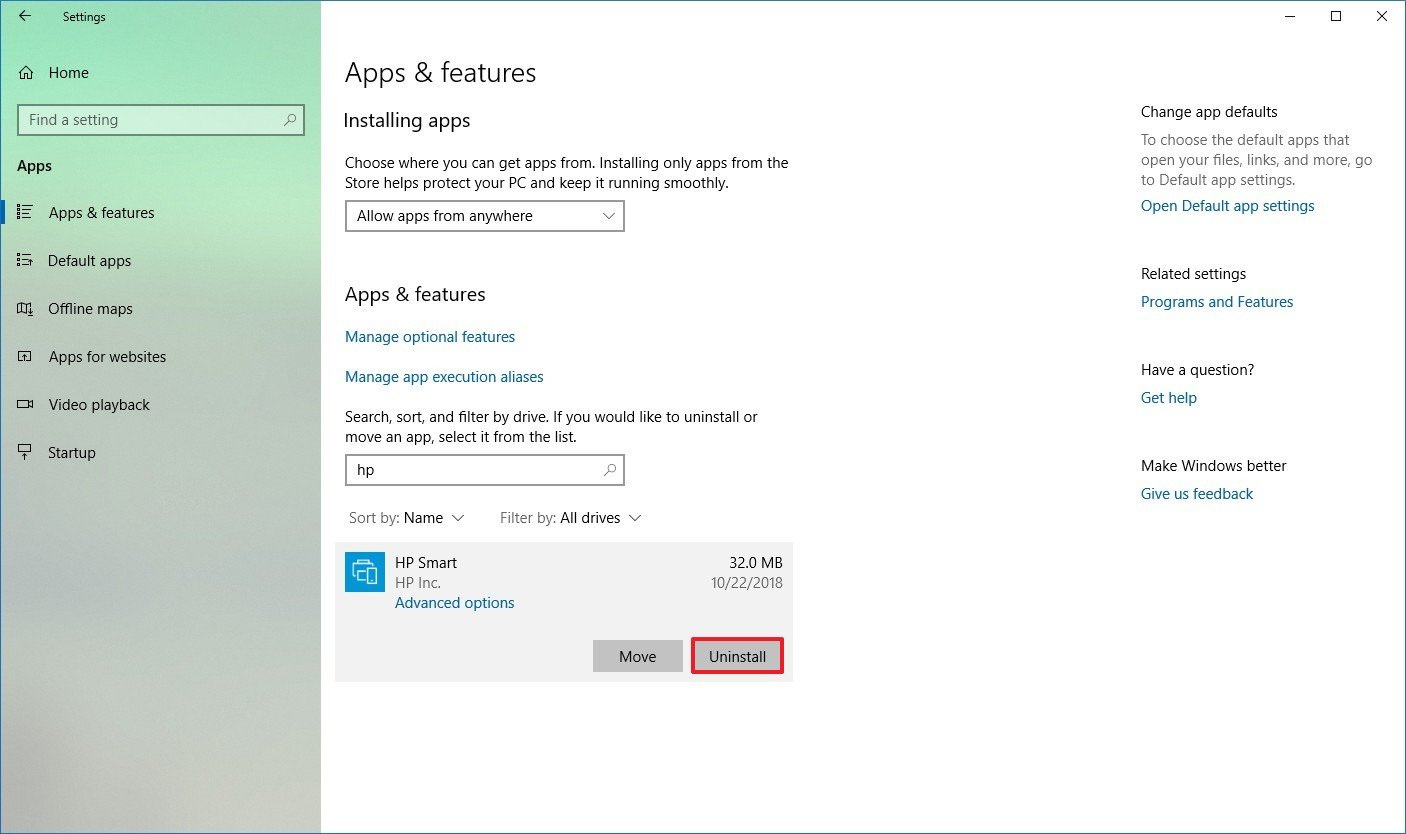
  3. Click on Apps & features.
  4. Select the software you want to remove.
  5. Click the Uninstall button.

  6. Continue with the on-screen directions to complete the removal.

How to uninstall a printer using Control Panel

Alternatively, you can still uninstall a printing device using Control Panel with these steps:

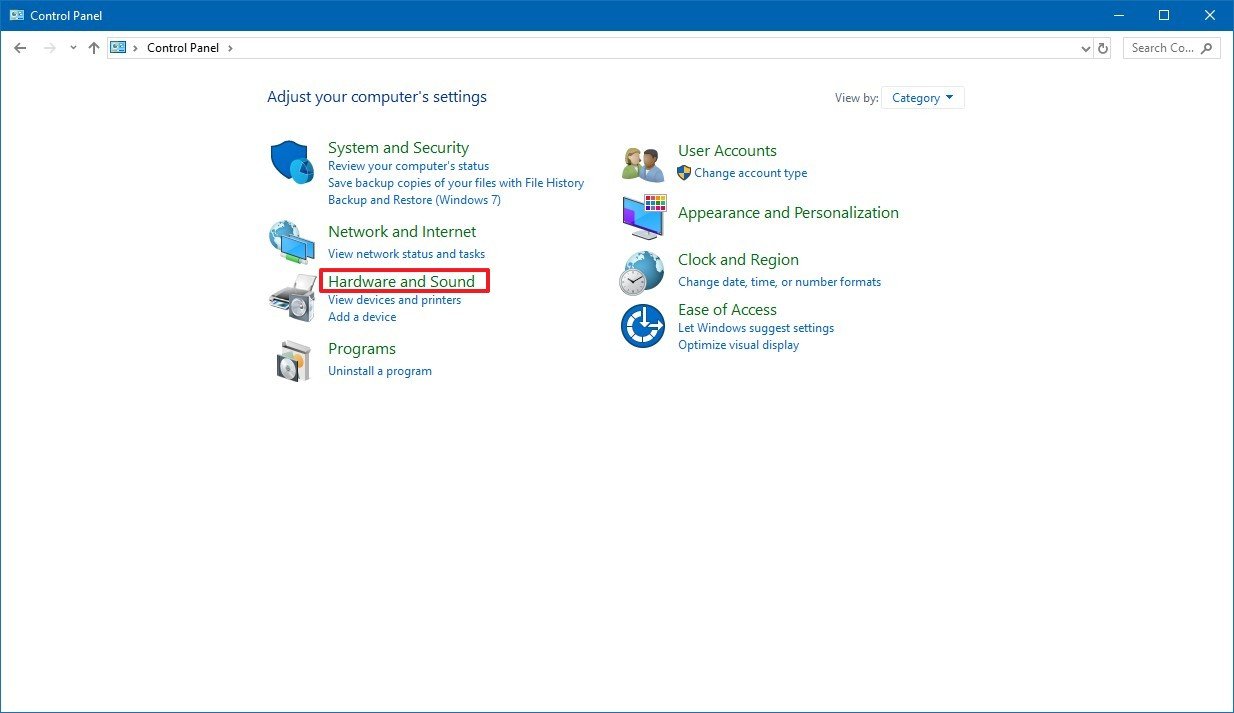
  1. Open Control Panel.
  2. Click on Hardware and Sound.

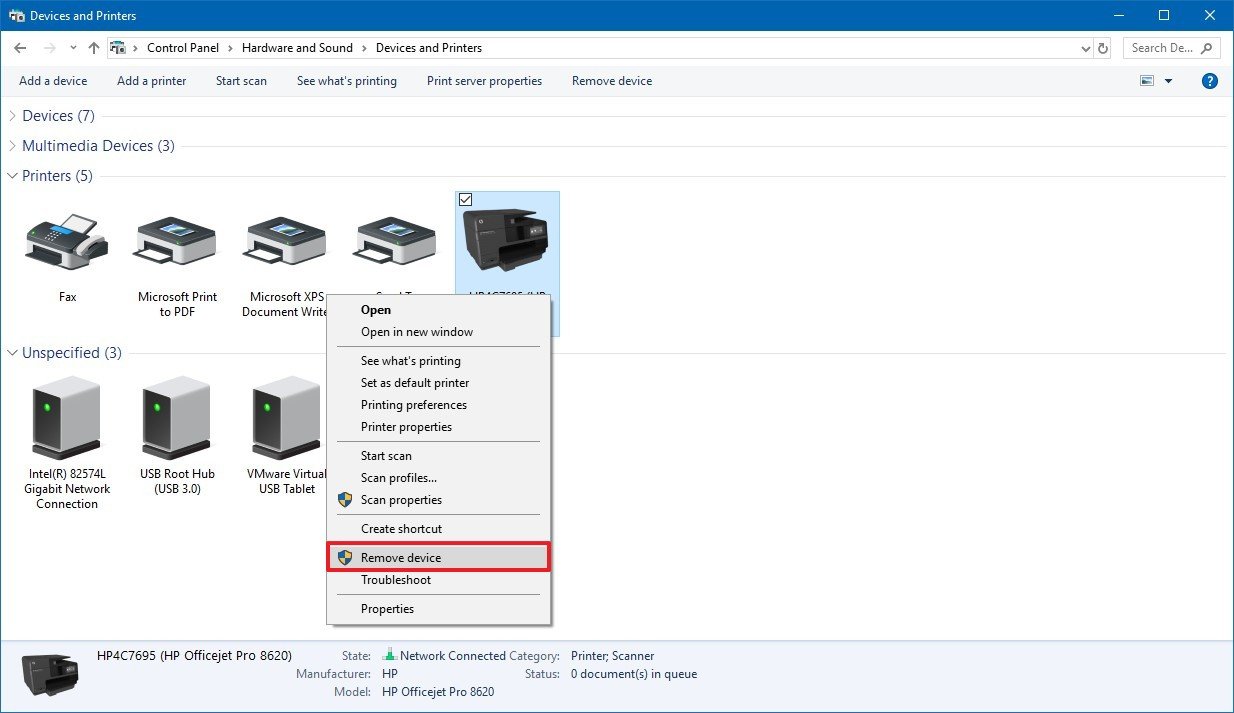
  3. Click on Devices and Printers.

  4. Under the “Printers” section, right-click the device you want, and select the Remove device option.

  5. Click the Yes button to confirm.

Once you’ve completed the steps, the printer in question will no longer be available on your device.

Uninstalling printer software

To remove left behind printer-related applications, use these steps:

  1. Open Settings.
  2. Click on Apps.
  3. Click on Apps & features.
  4. Select the software you want to remove.
  5. Click the Uninstall button.

  6. Continue with the on-screen directions to complete the removal.

How to uninstall a printer using Print Management

On Windows 10, you can also use the Print Management console to remove a printer you no longer use with these steps:

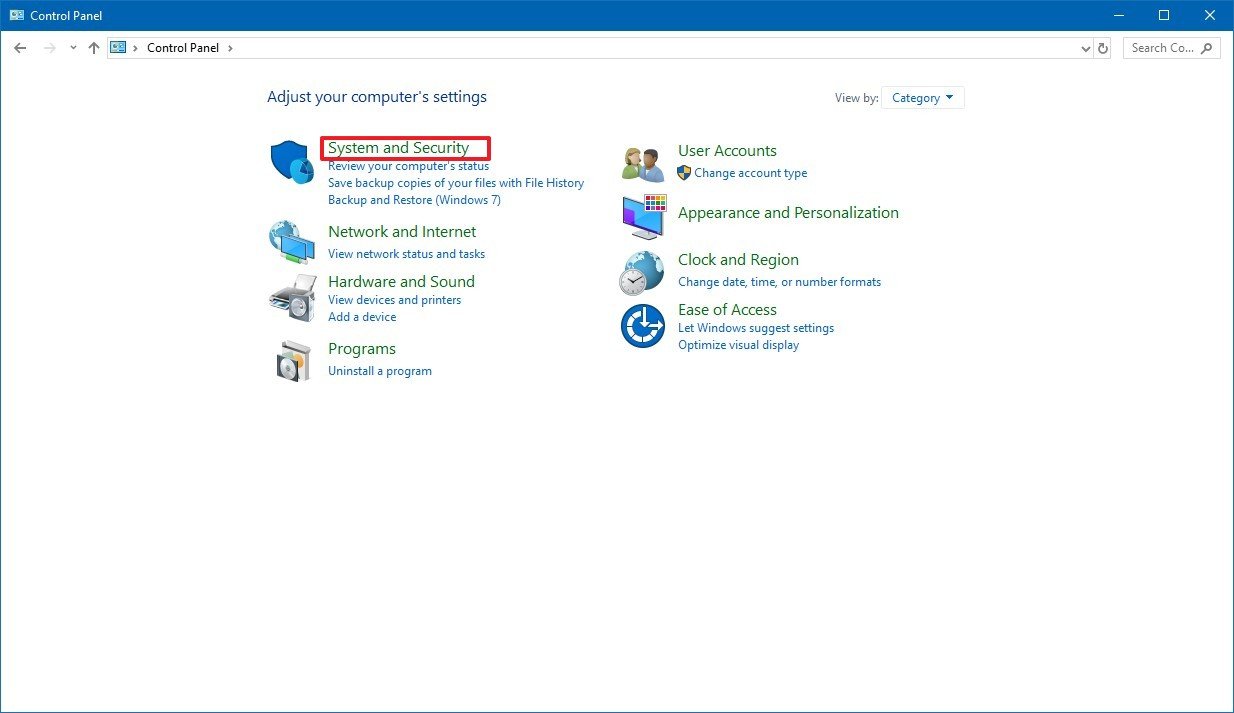
  1. Open Control Panel.
  2. Click on System and Security.

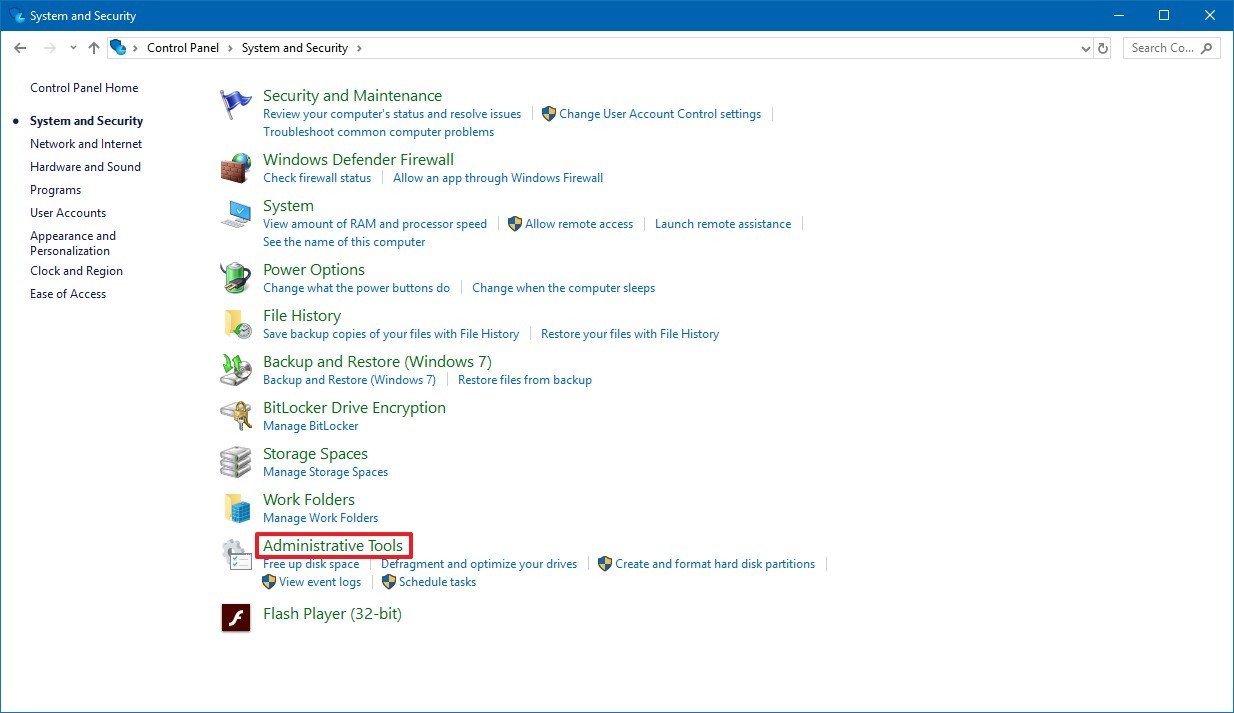
  3. Click on Administrative Tools.

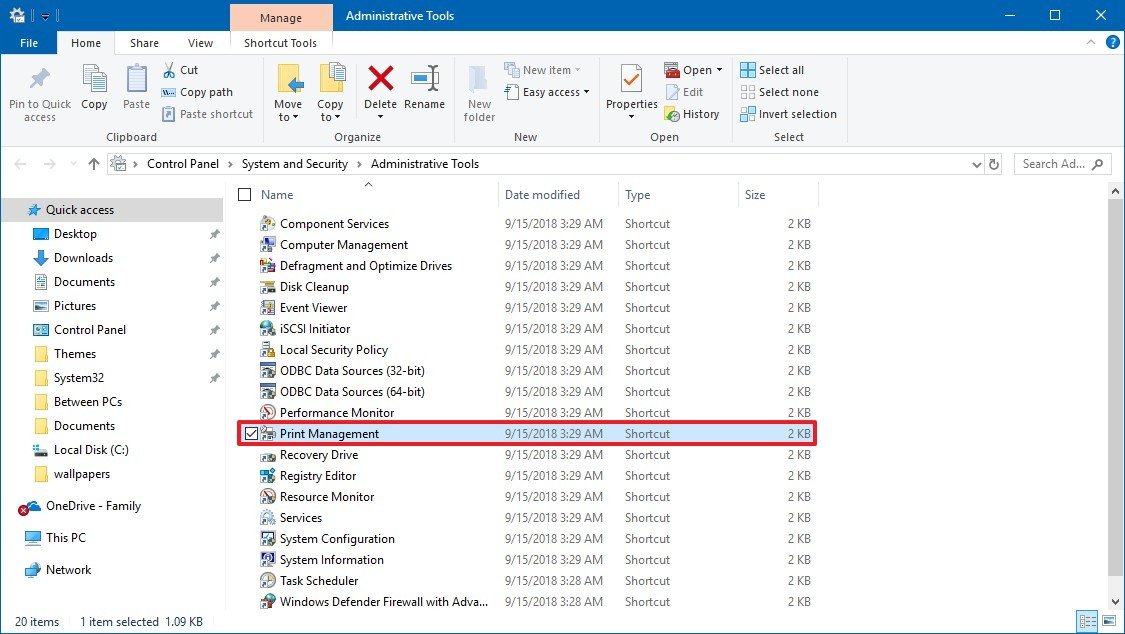
  4. Double-click the Print Management shortcut.

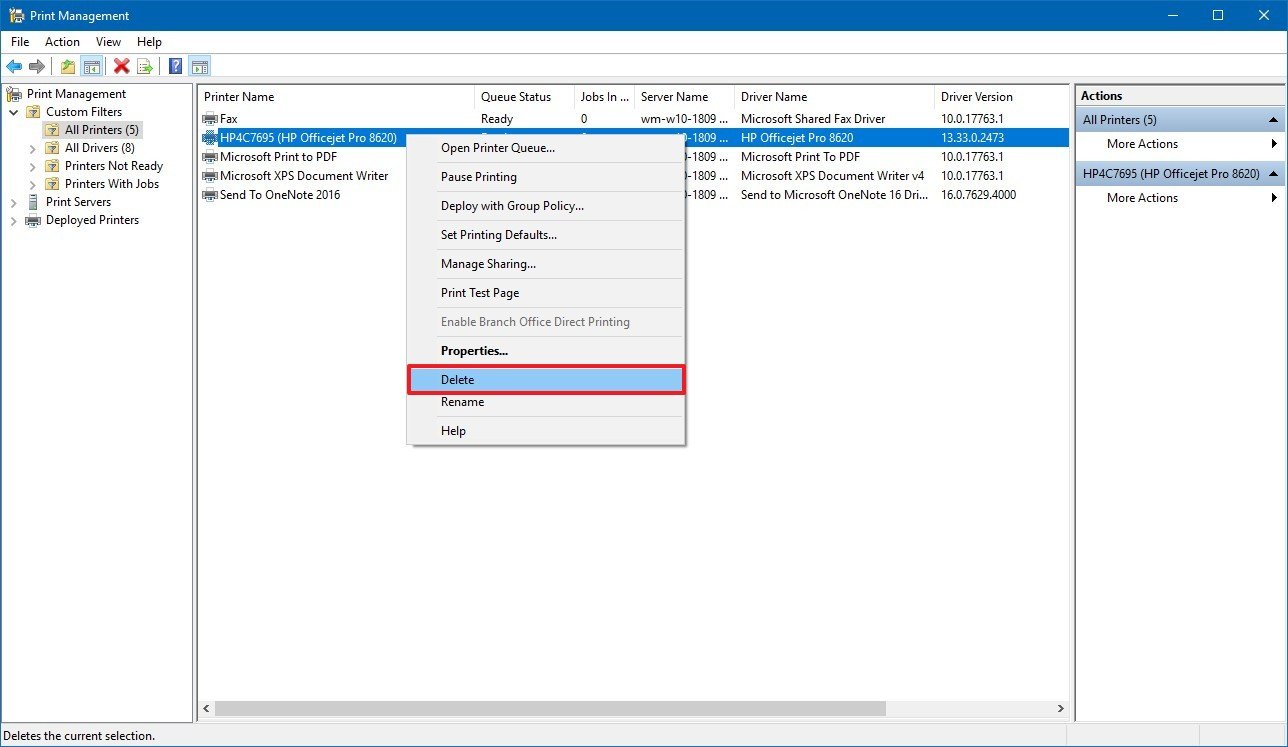
  5. Under “Custom Filters,” click on All Printers.
  6. Right-click the printer that you want to remove, and select the Delete option.

  7. Click the Yes button.

After completing the steps, the printer that you removed will no longer be available to any user.

Uninstalling printer software

To remove left behind printer-related applications, use these steps:

  1. Open Settings.
  2. Click on Apps.
  3. Click on Apps & features.
  4. Select the software you want to remove.
  5. Click the Uninstall button.

  6. Continue with the on-screen directions to complete the removal.

How to uninstall a printer using Command Prompt

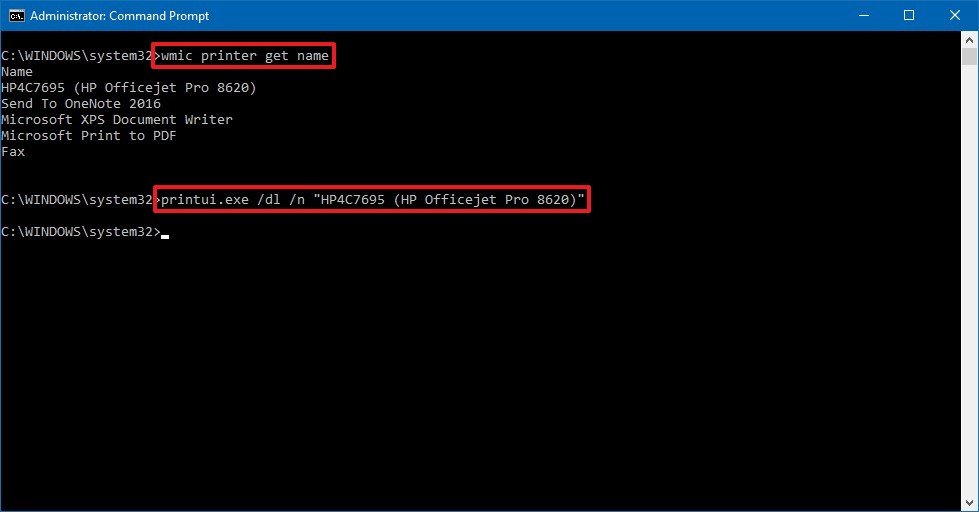
If you prefer using command lines, you can use Command Prompt to delete a printer from Windows 10 using these steps:

  1. Open Start.
  2. Search for Command Prompt, right-click the top result, and select the Run as administrator option.
  3. Type the following command to queue a list of printers on your device and press Enter:

    wmic printer get name

  4. Type the following command to uninstall the printer and press Enter:

    printui.exe /dl /n "YOUR-PRINTER-NAME"

    In the command, replace the YOUR-PRINTER-NAME with the full name of your printer see step No. 3.

Once you’ve completed the steps, the printer that you specified in the command will be uninstalled.

Uninstalling printer software

To remove left behind printer-related applications, use these steps:

  1. Open Settings.
  2. Click on Apps.
  3. Click on Apps & features.
  4. Select the software you want to remove.
  5. Click the Uninstall button.

  6. Continue with the on-screen directions to complete the removal.

How to uninstall a printer using PowerShell

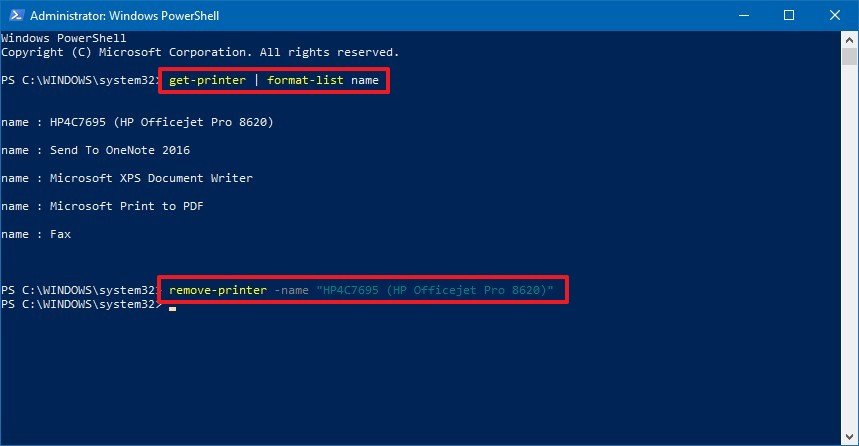
If you prefer to use PowerShell, you can use these steps to remove a printer from Windows 10:

  1. Open Start.
  2. Search for Windows PowerShell, right-click the top result, and select the Run as administrator option.
  3. Type the following command to queue a list of printers on your device and press Enter:

    Get-Printer | Format-List Name

  4. Type the following command to uninstall the printer and press Enter:

    Remove-Printer -Name "YOUR-PRINTER-NAME"

    In the command, replace the YOUR-PRINTER-NAME with the full name of your printer see step No. 3.

After completing the steps, the printer that you selected will be removed from your computer.

Uninstalling printer software

To remove left behind printer-related applications, use these steps:

  1. Open Settings.
  2. Click on Apps.
  3. Click on Apps & features.
  4. Select the software that you want to remove.
  5. Click the Uninstall button.

  6. Continue with the on-screen directions to complete the removal.

How to enable ‘Boot Log’ on Windows 10

On Windows 10, when you’re having driver issues, you can enable the “Boot Log” option to create a special ntbtlog.txt file that includes a detailed list of the loaded and unloaded drivers during boot.

The option won’t fix any problems your device may be experiencing, but you can analyze this information to understand what might be preventing Windows 10 from loading correctly to find an appropriate fix.

In this Windows 10 guide, we walk you through the steps to enable “Boot Log” to collect information about the loaded and not loaded drivers during startup using System Configuration and Command Prompt.

  • How to enable ‘Boot log’ using System Configuration
  • How to enable ‘Boot log’ using Command Prompt

How to enable ‘Boot log’ using System Configuration

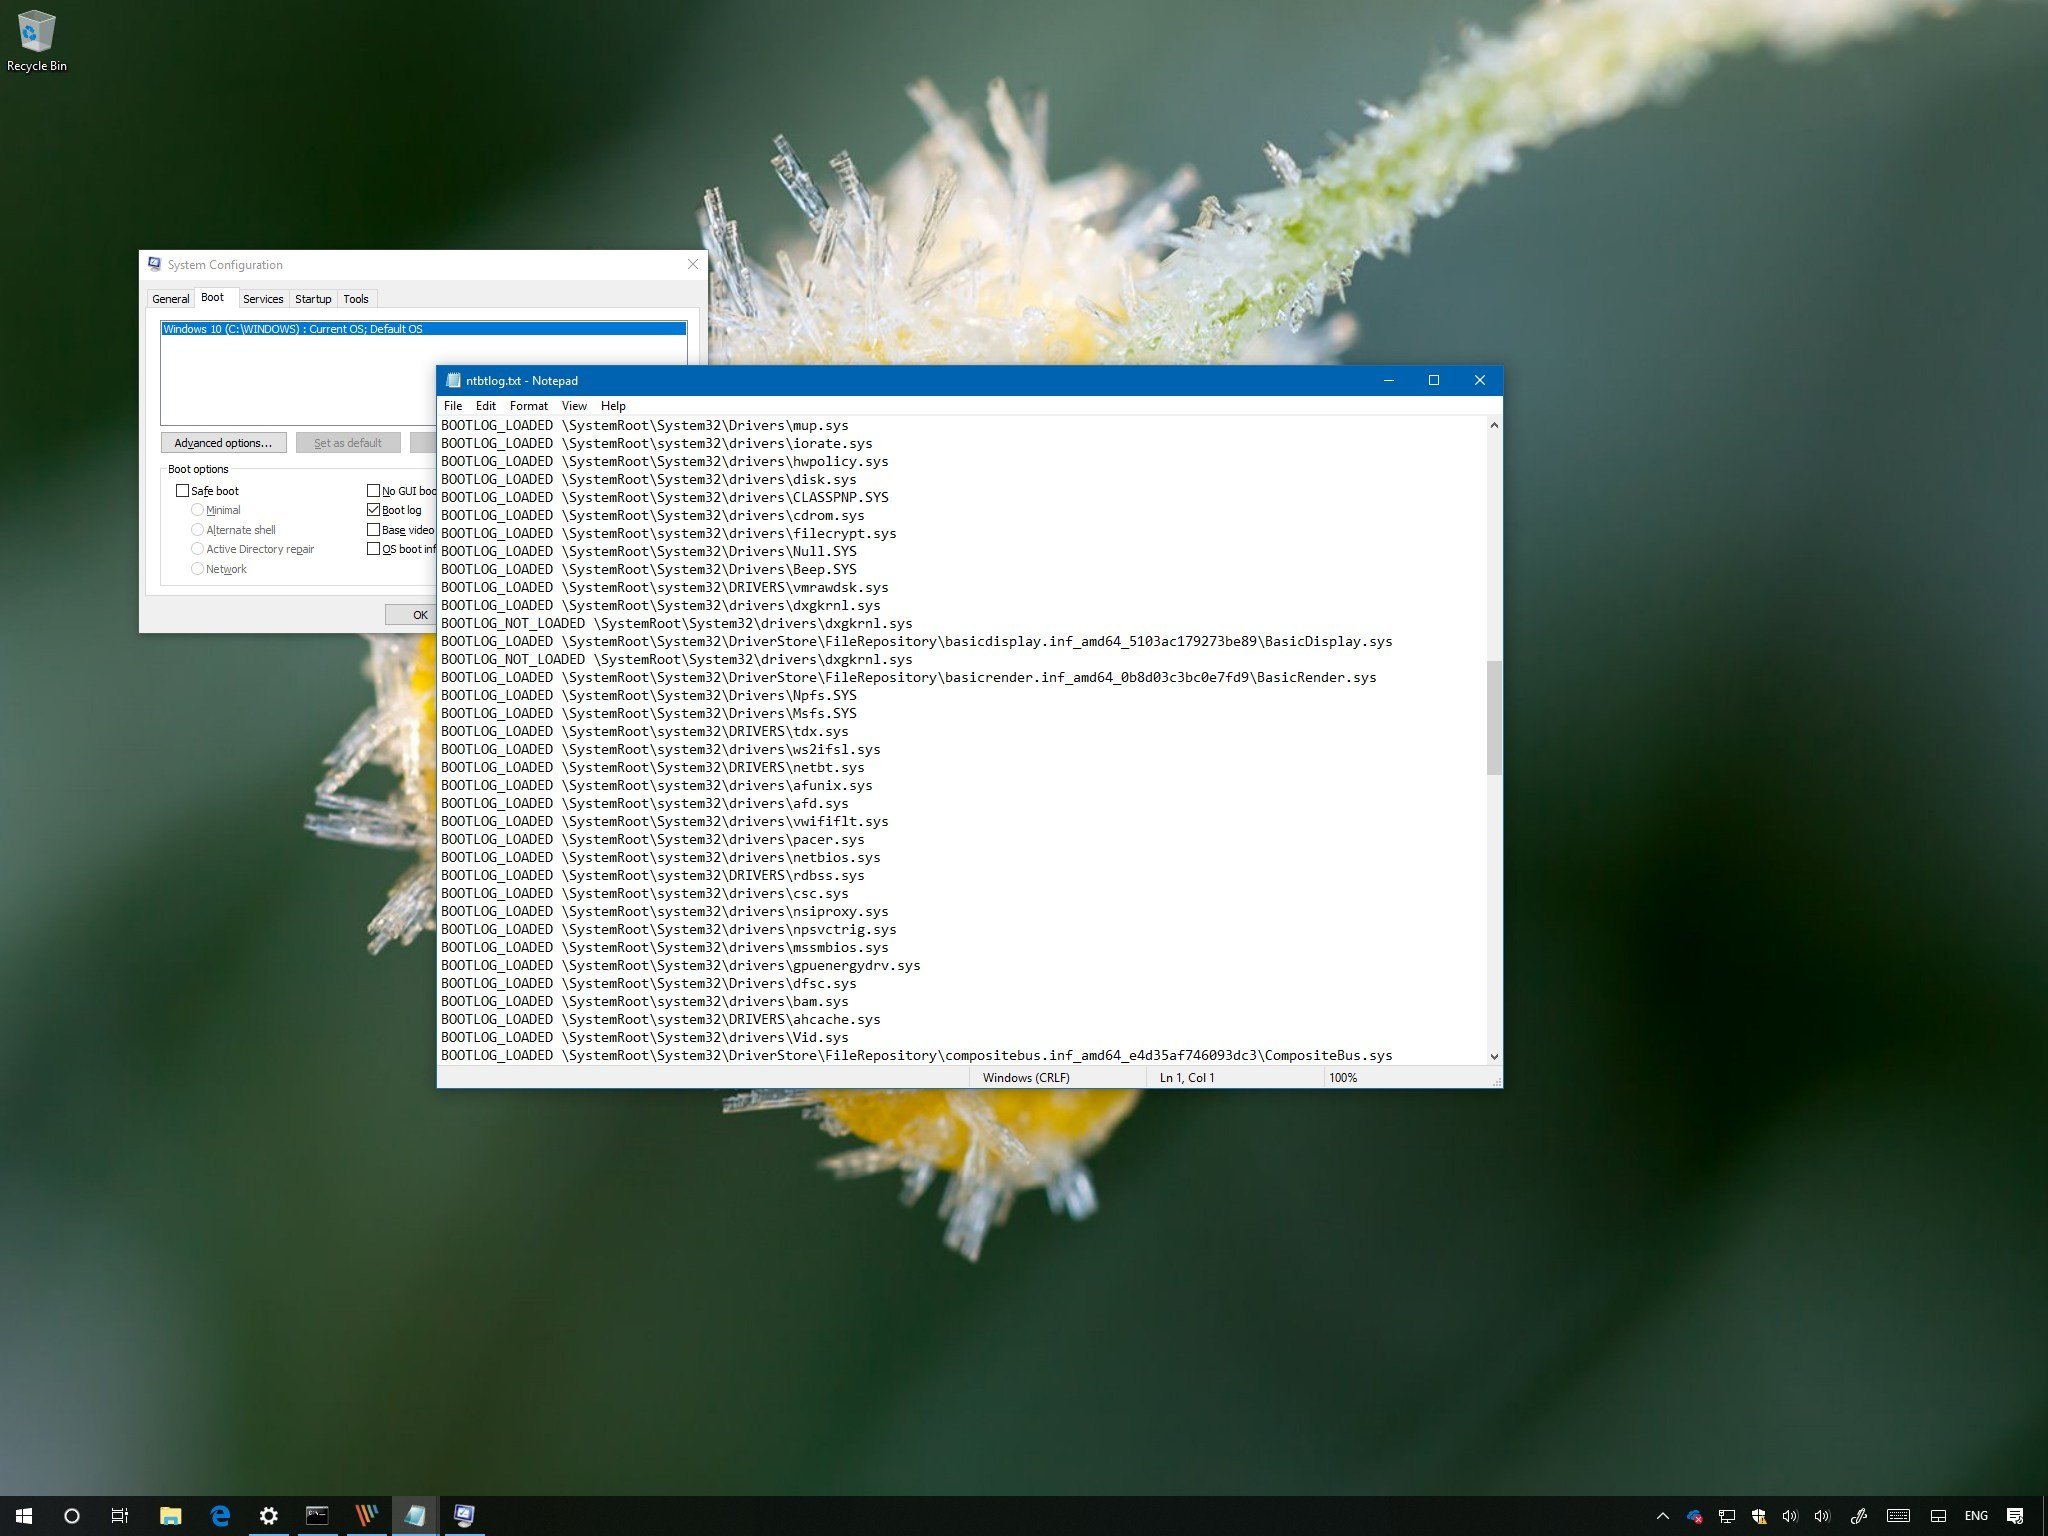
To log driver information during boot using System Configuration, use these steps:

  1. Open Start.
  2. Search for System Configuration and click the top result to open the experience.(Quick Tip: You can also use the Windows key + R keyboard shortcut to open the Run command, enter the msconfig command, and click OK to open System Information.)
  3. Click on the Boot tab.
  4. Check the Boot log option.
  5. Click the Apply button.
  6. Click the OK button.
  7. Click the Restart button.

Once you complete these steps, a special log file will be created with the drivers that were loaded, including those that were omitted.

Viewing the ntbtlog text file

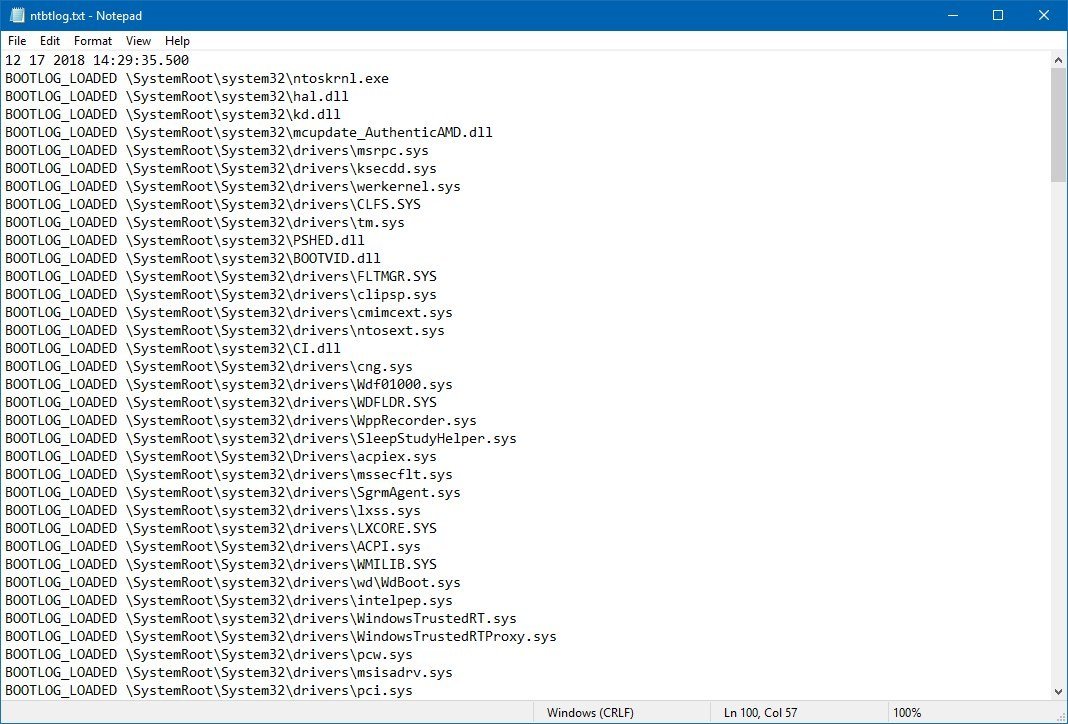
To find and view the ntbtlog.txt file, use these steps:

  1. Use the Windows key + R keyboard shortcut to open the Run command.
  2. Type the following file path:c:\Windows\ntbtlog.txt
  3. Click the OK button.

In the text file, you can see a list of loaded and unloaded drivers during boot, which you can now use in your troubleshooting process to fix a related issue.

If you no longer need the “Boot Log,” you can disable the feature using the same instructions mentioned above, but on step No. 4, make sure to clear the option.

How to enable ‘Boot log’ using Command Prompt

To log driver information during boot using Command Prompt, use these steps:

  1. Open Start.
  2. Search for Command Prompt, right-click the top result, and select the Run as administrator option.
  3. Type the following command and press Enter:bcdedit
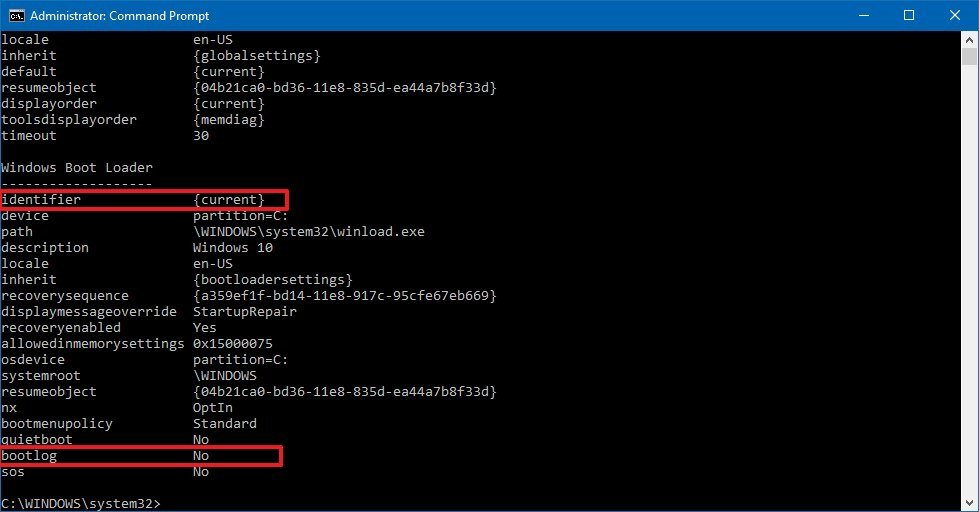
  4. Under the “Windows Boot Loader” section, note the “identifier” and “bootlog” information. For example:
    • identifier — {current}.
    • bootlog — No.
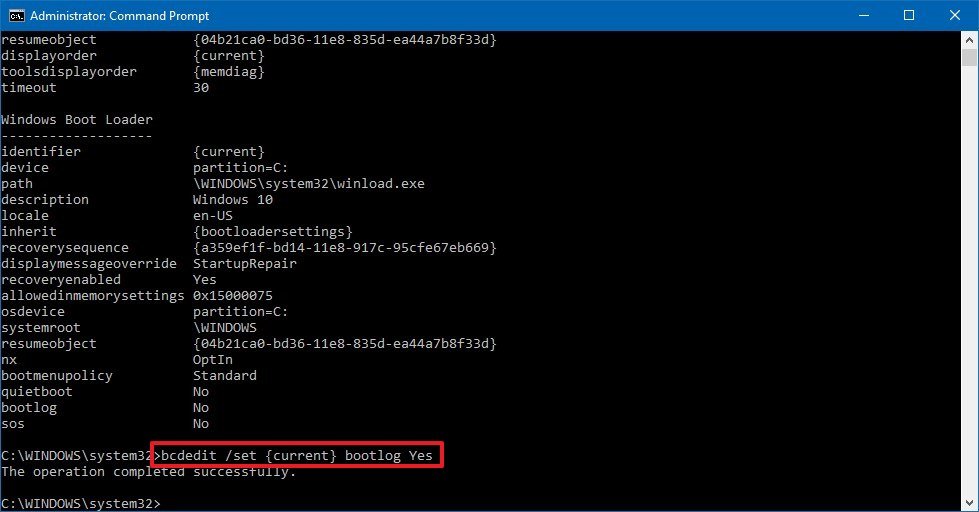
  5. Type the following command to enable logs during boot and press Enter:bcdedit /set {current} bootlog Yes

    In the command, make sure to replace {current} with the information in your identifier.

After completing the steps, a log file will be created in the Windows folder with the drivers that were loaded, including those that were not loaded.

Viewing the ntbtlog text file

To find and view the “Boot Log” file, use these steps:

  1. Use the Windows key + R keyboard shortcut to open the Run command.
  2. Type the following file path:c:\Windows\ntbtlog.txt
  3. Click the OK button.

In the text file, you can see information about drivers that Windows 10 loaded and didn’t load during the boot process, which you can now use in your troubleshooting process to resolve a related problem.

You can always revert the changes using the same instructions outlined above, but on step No. 5, make sure to use this command: bcdedit /set {current} bootlog No.

Although this guide is focused on Windows 10, the “Boot Log” option has been available for years, and you can also use the same instructions on Windows 8.1 and Windows 7.

How to recover unsaved documents in Office?


It’s just a matter of time until you accidentally close an Office application without saving its content. Or your computer or app crashes unexpectedly while working on that important project due at the end of the day.

However, when the unexpected happens, no everything is lost. Whether you’re using a Microsoft Office 365 subscription, or standalone version of Office 2019, Office 2016, or earlier, there’s a good chance to recover your work as the apps offer a few ways to recover unsaved documents.

In this Windows 10 guide, we’ll walk you through the steps to recover unsaved Office documents and the things you can do to avoid getting into this situation.

  • How to recover unsaved document in Office
  • How to avoid unsaved document recovery in Office

We’ll be focusing this guide on Microsoft Word 2019, but the instructions work pretty much identical with older versions, including for other apps, such as Excel and PowerPoint.

How to recover unsaved document in Office

If you close an Office application without saving its content, or your device or app crashed unexpectedly, then you can recover the unsaved document in more than one way.

Using Document Recovery pane

To recover a document that wasn’t saved correctly, use these steps:

  1. Open the Office app that you created the document. For example, Word.
  2. Create a new blank document.
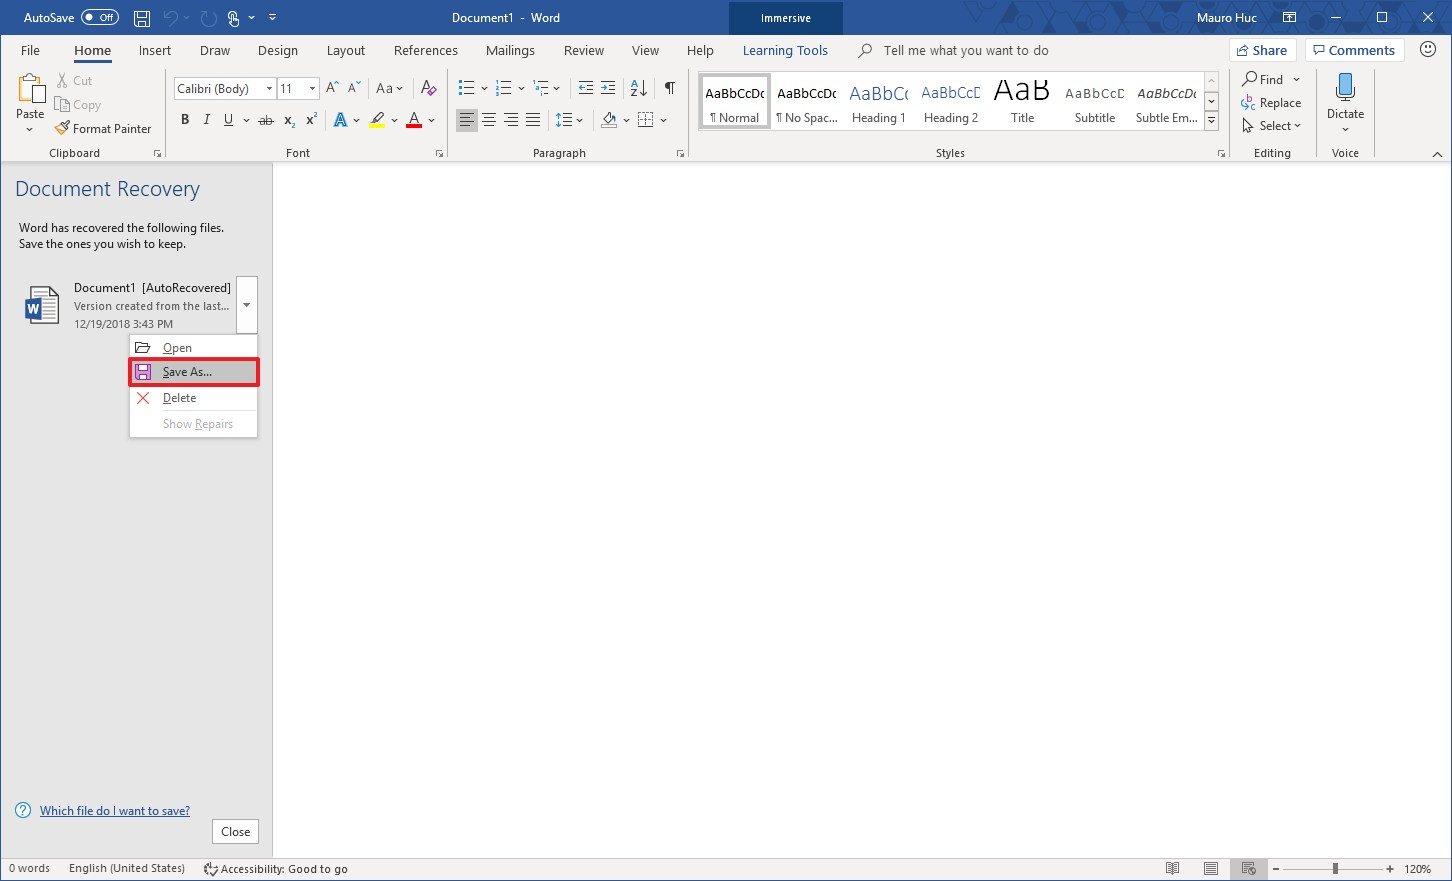
  3. Under the Document Recovery section, in the left pane, click the down-arrow button for the document to recover, and select the Save as option.
  4. Select the folder to recover the unsaved document.
  5. Click the Save button.

Once you’ve completed the steps, you can open the recovered document from the folder you selected.

Using Recover Unsaved Documents option

If you don’t see the “Document Recovery” pane, then use these steps:

  1. Open the Office app that you created the document. For example, Word.
  2. Create a new blank document.
  3. Click the File menu.
  4. Click on Info.
  5. Click the Manage Document option.
  6. Click the Recover Unsaved Documents option.
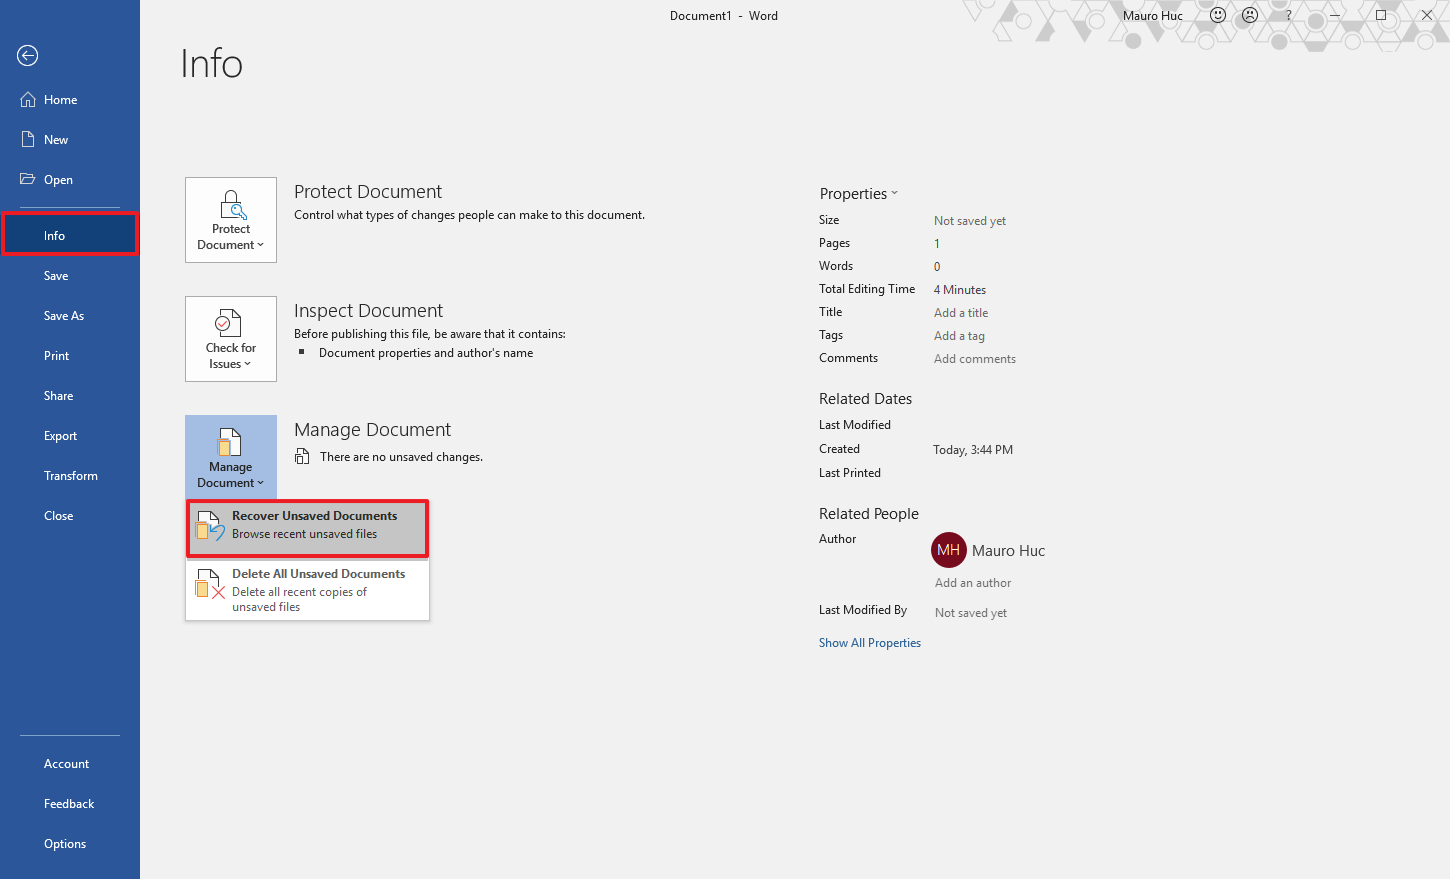
  7. Select the unsaved document to recover.
  8. Click the Open button.

You can also access unsaved documents using these steps:

  1. Open the Office app that you created the document. For example, Word.
  2. Create a new blank document.
  3. Click the File menu.
  4. Click on Open.
  5. Click the Recover Unsaved Documents button.
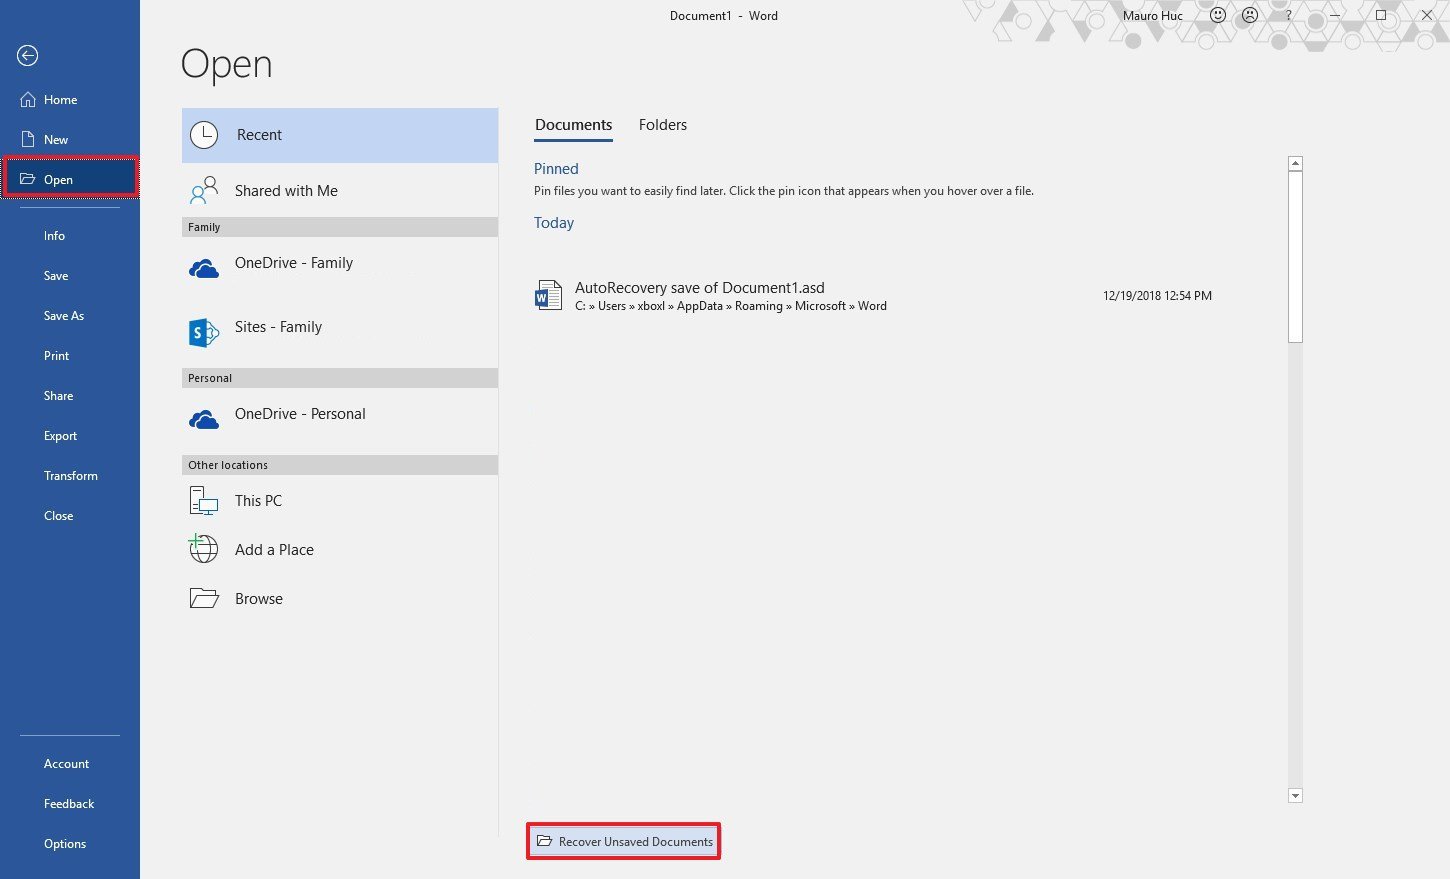
  6. Select the document.
  7. Click the Open button.

Once you’ve completed the steps, make sure to save the recovered document before continue adding new content.

Using the AutoRecover file location

If the UnsavedFiles folder is empty, then you can use these steps to recover unsaved documents.

  1. Open the Office app that you created the document. For example, Word.
  2. Create a new blank document.
  3. Click the File menu.
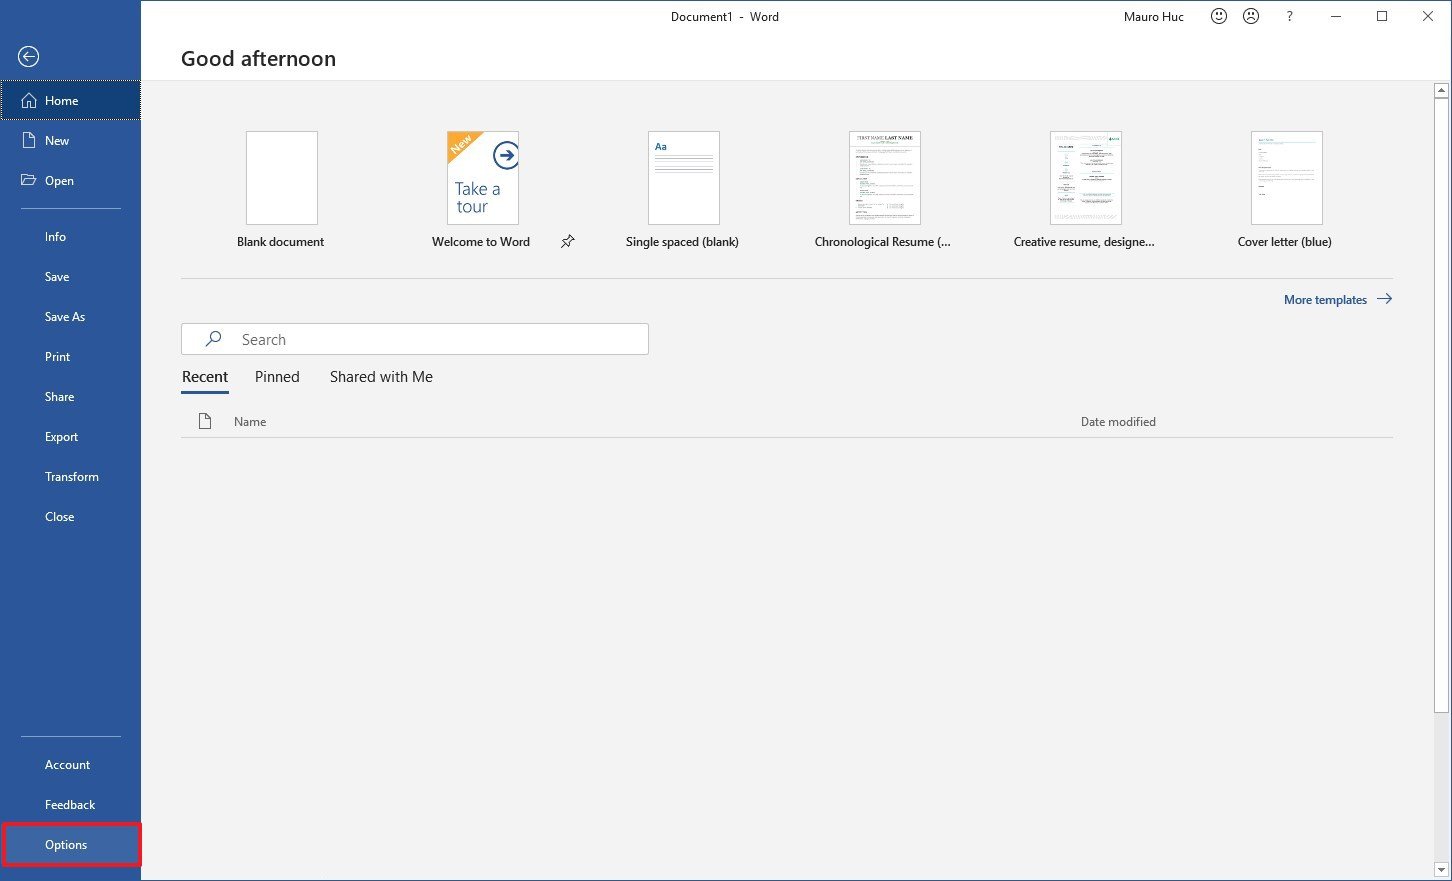
  4. Click on Options.
  5. Click on Save.
  6. Under the “Save documents” section, select the AutoRecover file location path, right-click the selection, and select the Copy option.
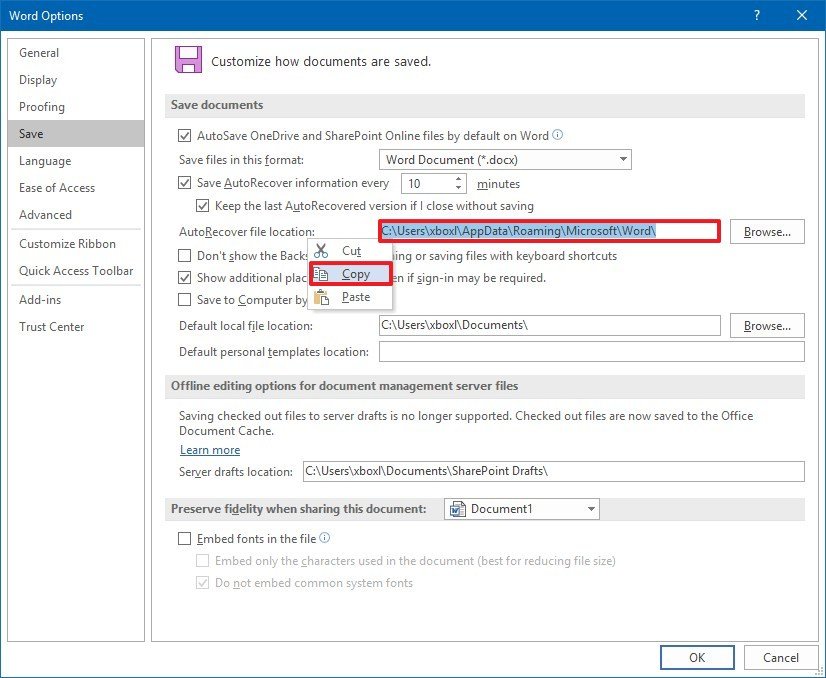
  7. Open File Explorer (Windows key + E).
  8. Right-click and paste the path in the File Explorer address bar and press Enter.
  9. Right-click the .asd file of the document that you want to recover, and select the Open with option.
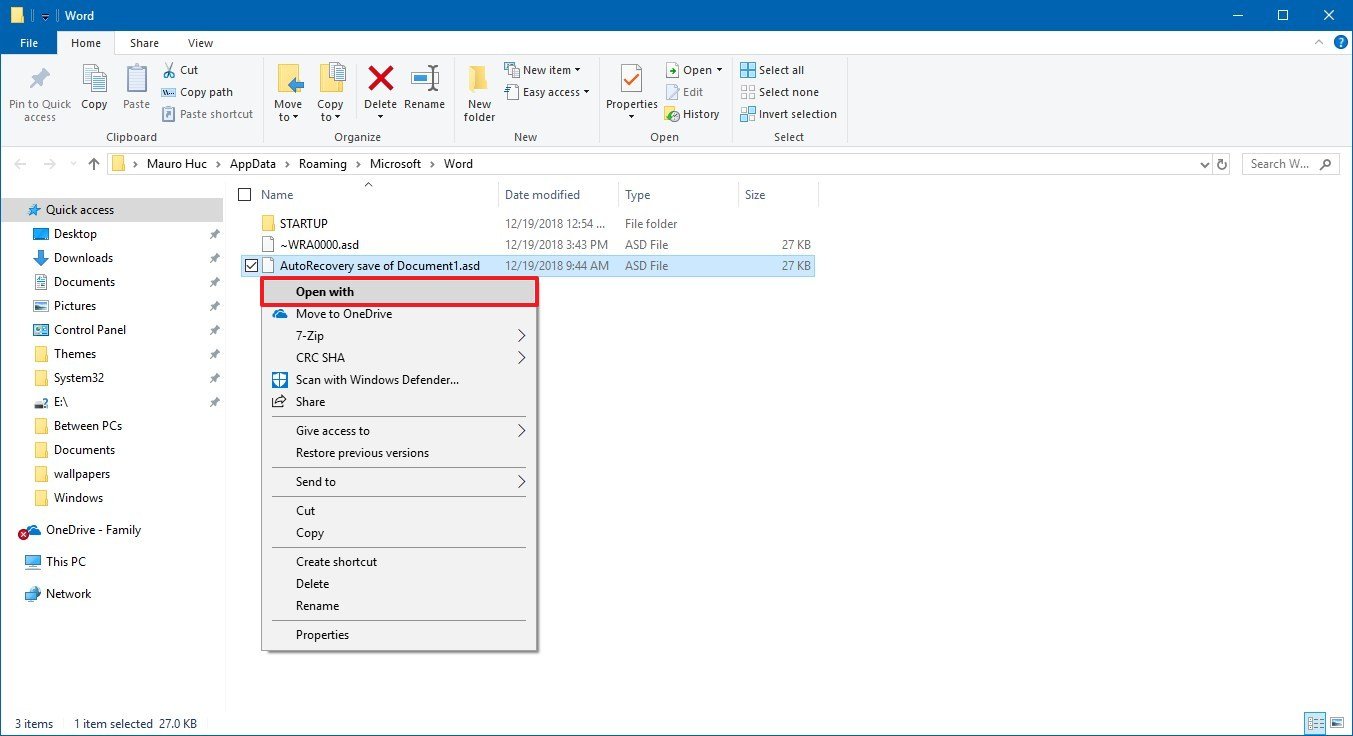
  10. Select the appropriate app to open the files.
  11. Click the OK button.

In this folder, you will only find the documents for the app that you’re using. If you’re looking to recover a document created with another Office application, then follow these steps with the correct application.

How to avoid unsaved document recovery in Office

Although Office includes a mechanism to recover documents that you didn’t save, the feature doesn’t always work as we would like, as such we’ll outline below several tips to avoid having to use the recovery options.

Create a new document before opening Office

When you open an Office app, you always start with the startup experience, which allows you to create a new blank document or a document using a template. Instead of using the startup experience, make a habit of creating the file manually before opening the app.

  1. Open File Explorer.
  2. Navigate to the folder where you usually save your documents.
  3. Right-click on a space, select New, and click the document that you want to create (such as Word, Excel, PowerPoint).
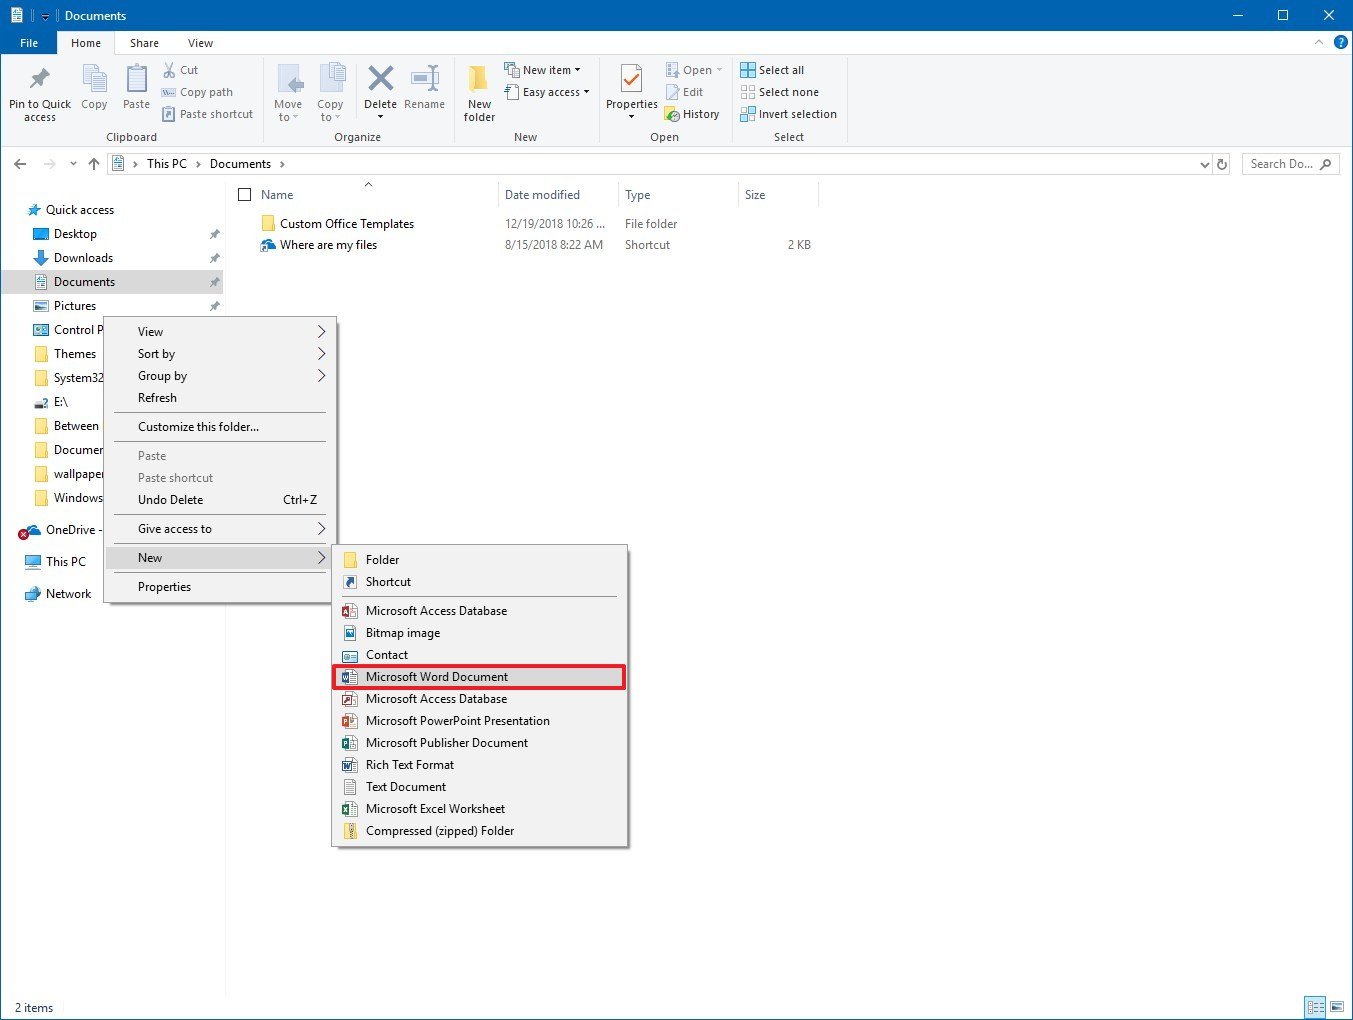
  4. Type a name of the document and press Enter.

After completing the steps, double-click the file, and you’ll start with an already saved document, which means that you’ll reduce the chances of losing the file and hours of work as the changes will now save automatically.

Enable document recovery

Although auto recovery should be enabled by default, you can avoid losing hours of hard work making sure that the AutoRecover feature is enabled on all the Office applications using these steps:

  1. Open an Office app. For example, Word.
  2. Click on File.
  3. Click on Options.
  4. Click on Save.
  5. Under the “Save documents” section, make sure that these options are checked:
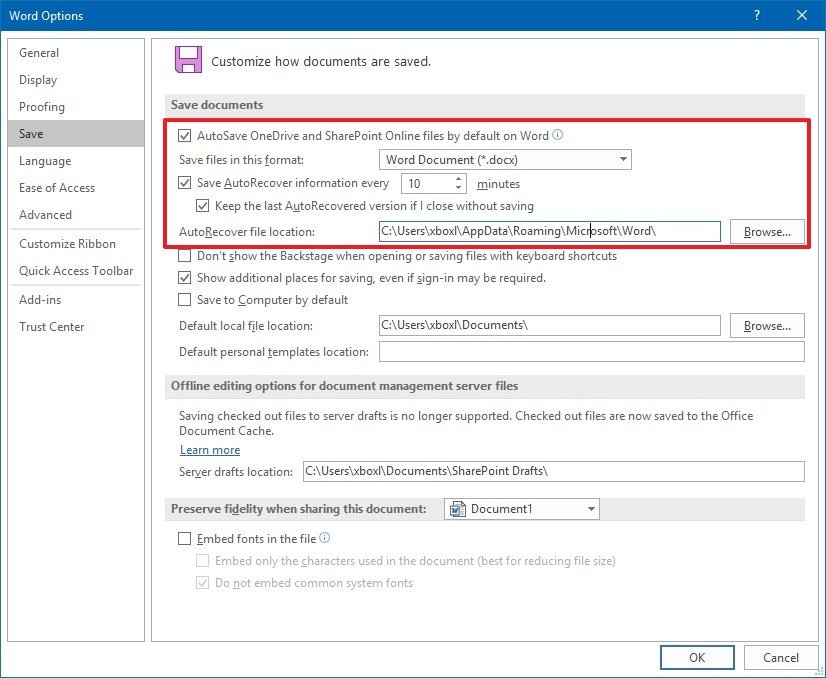
    • AutoSave OneDrive and SharePoint Online files by default on Word.
    • Save AutoRecover information every X minutes.
    • Keep the last AutoRecovered version if I close without saving.
  6. Confirm that AutoRecover file location has a valid path (no empty).

After completing the steps, you want to repeat the instructions in Excel and other apps you may use.

Adjust the autosave settings

Office apps usually save changes every ten minutes automatically, but you can adjust the autosave settings to reduce the amount of work you can lose as a result of the ten minutes gap.

  1. Open an Office app. For example, Word.
  2. Click the File menu.
  3. Click on Options.
  4. Click on Save.
  5. Under the “Save documents” section, change the Save AutoRecover information every 10 minutes option to 1 minute.
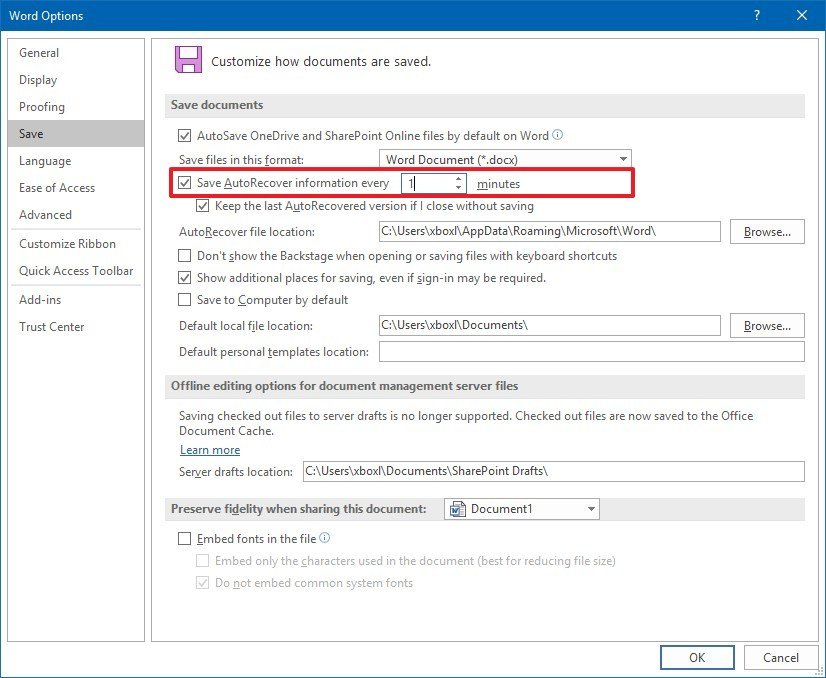
  6. Click the OK button.

Once you’ve completed the steps, changes you make to the document will save automatically every 60 seconds, which will minimize the amount of work that you may lose if the app crashes or something goes wrong with the file.

Turn on real-time AutoSave

If you’re an Office 365 subscriber, you can turn on AutoSave, which saves new content in real-time.

  1. Open an Office app. For example, Word.
  2. Click the File menu.
  3. Click on Save.
  4. Select a name for the file.
  5. Click the Save button.
  6. Turn on the AutoSave toggle switch in the top-left corner.
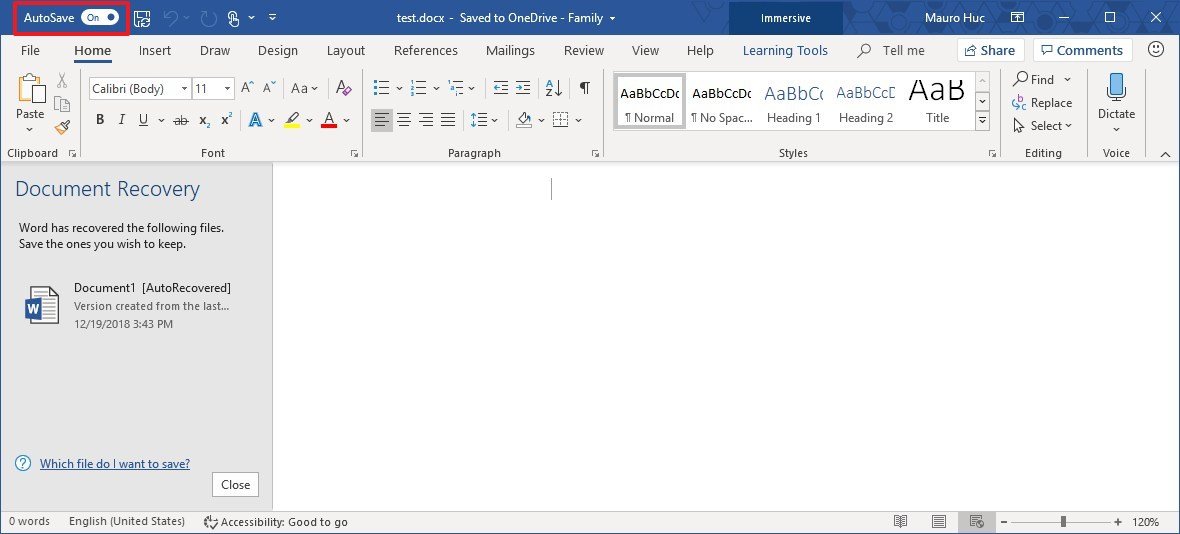
After completing the steps, changes you make to the document will save immediately automatically.

If you use other apps, such as Excel and PowerPoint, make sure to repeat these steps on all the apps you use.

You just got a new Windows 10 PC! Here’s what you need to know.

Welcome to your new PC! Once the wrapping paper has been torn off and the initial “oooooooh” moment has gone away its time to get down to the business of actually setting up and using it. And that’s where we come in.

It’s not as daunting as it perhaps once was, but here are some tips to help you get going the right way with your new Windows 10 PC.

Sign up for a Microsoft Account

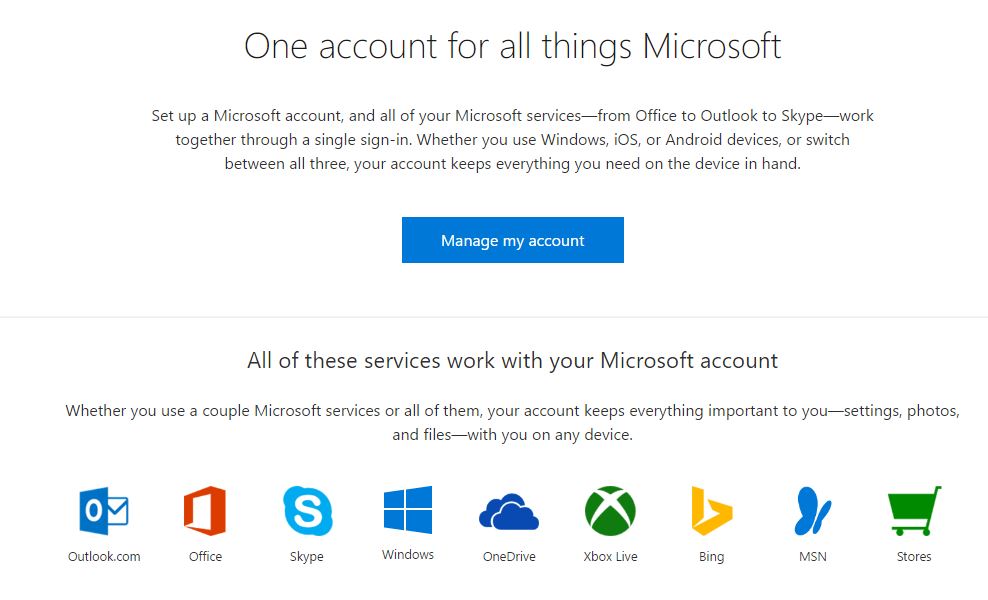
Microsoft Account

If you don’t have one yet, a Microsoft Account is a very useful thing to have. Not only can you now link your Windows 10 license to it so things are easier to fix in the event you have to start again from scratch, but it’s necessary to download apps from the Store for one. You can also use it to help Cortana synced across your devices, PC and mobile, sign in to Xbox Live, Outlook, even buy things at the Microsoft Store and much more.

Getting one is easy, simply head on over to the Microsoft Account home page and hit sign up!

Switching from Mac

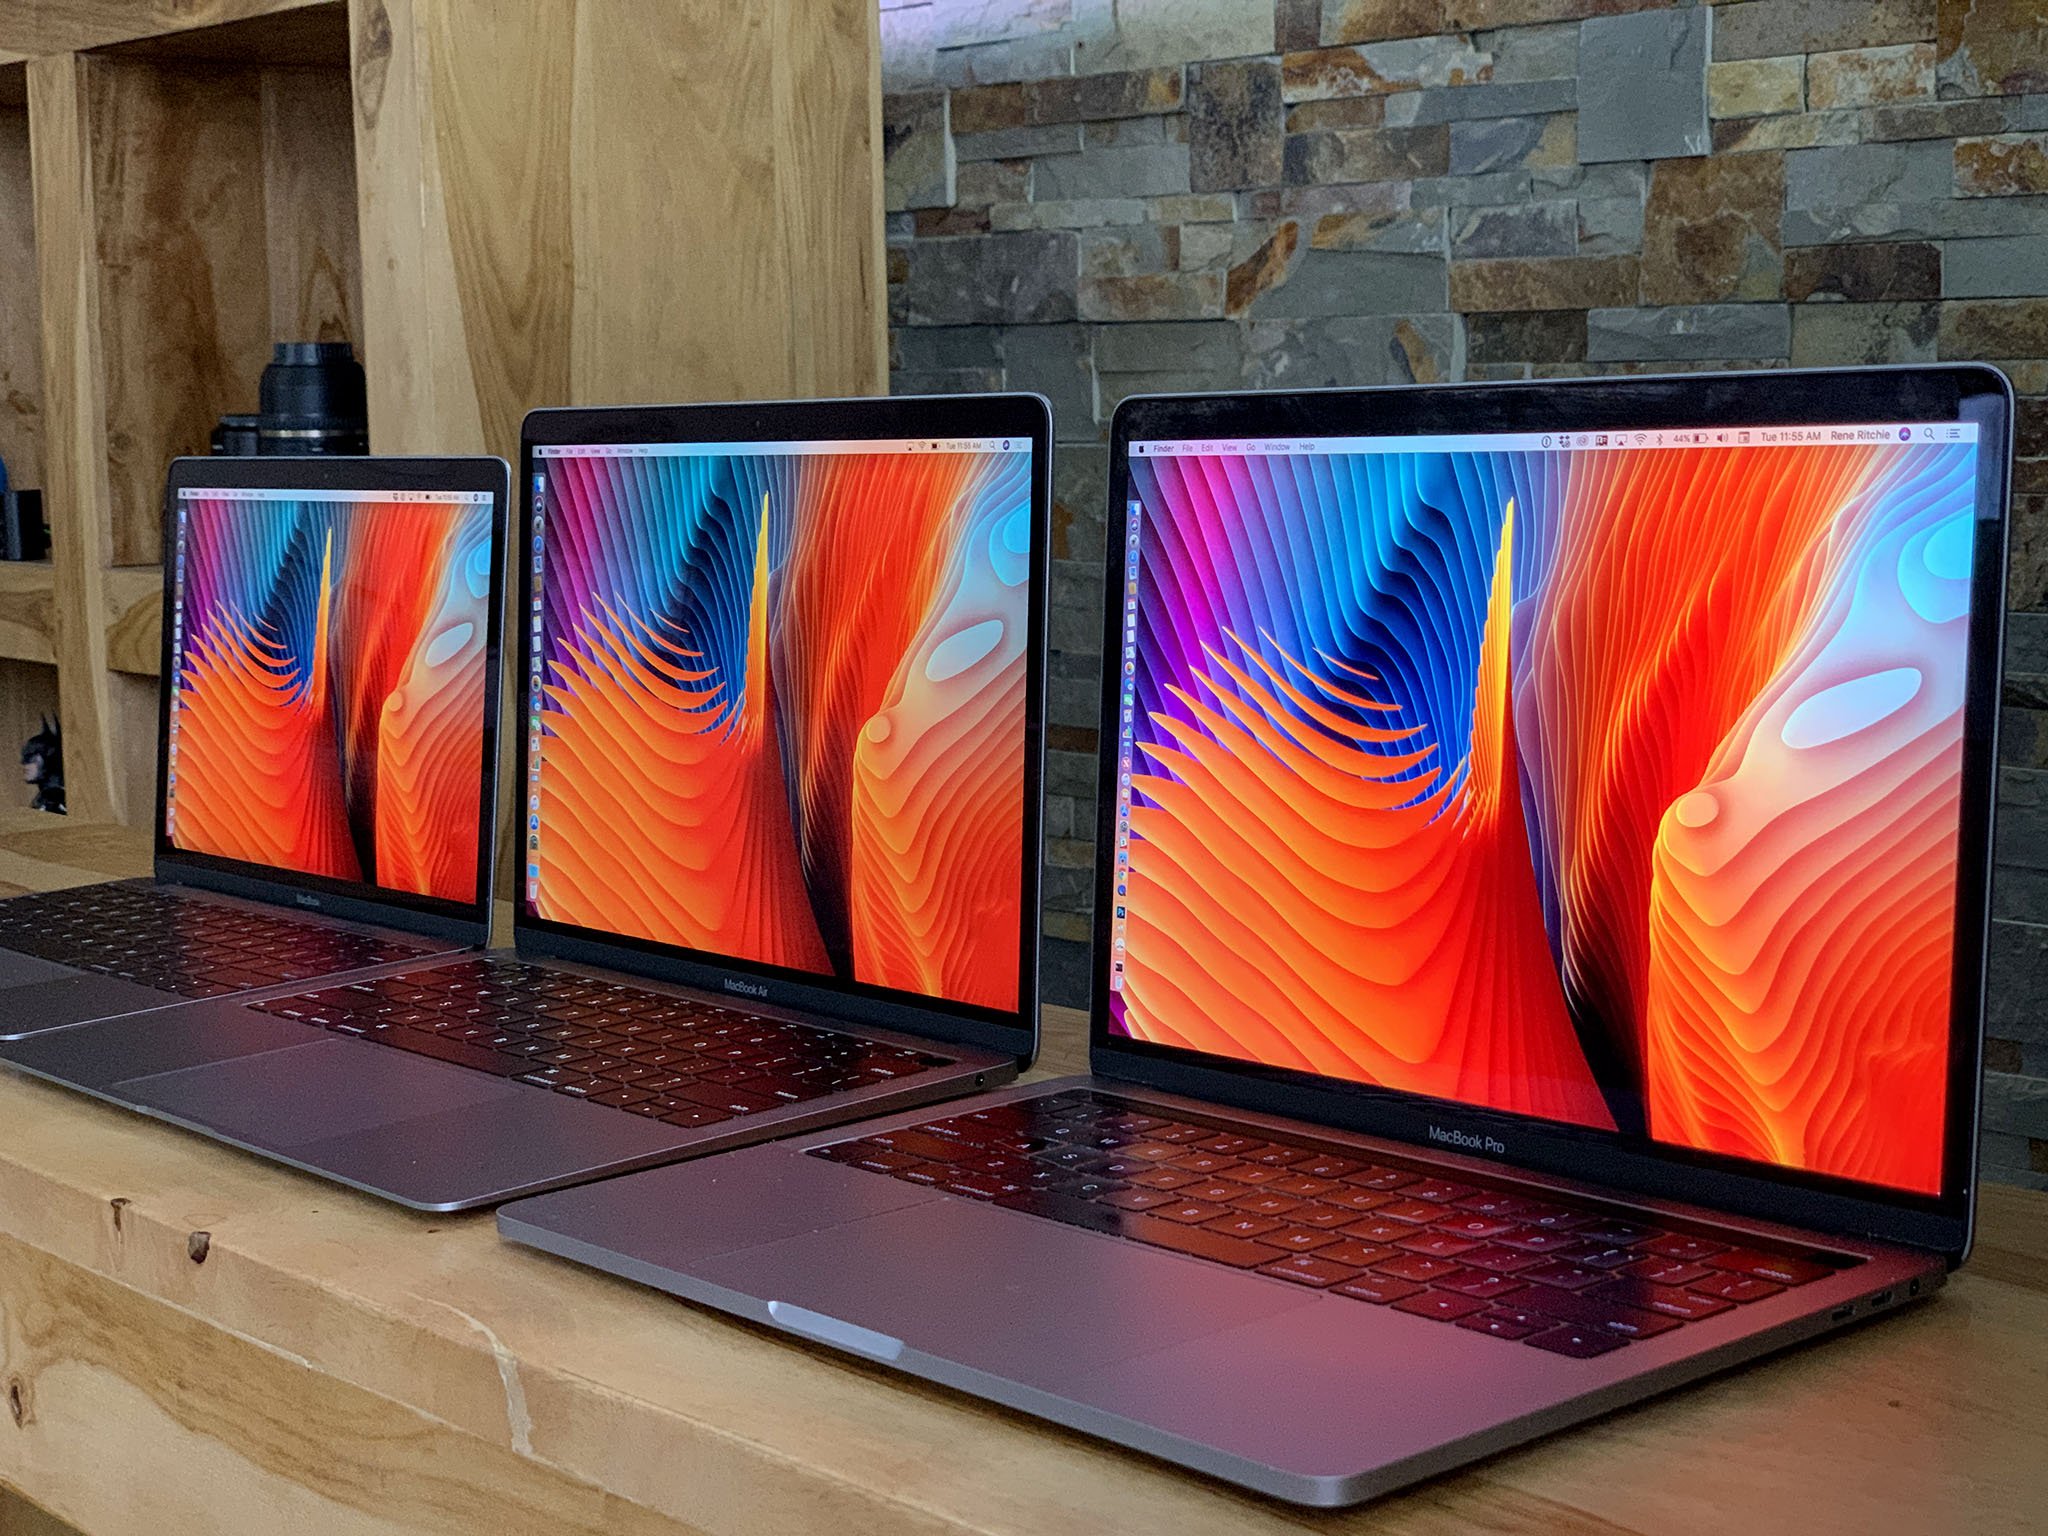
If you’re just dipping a toe in Windows after having a Mac, firstly, welcome! Secondly, you probably have personal stuff in iCloud that you don’t want to lose as you’re setting up your new PC. The good news is you can not only get your things into Windows but keep on using iCloud should you wish to — especially if you’re still using an iPhone!

Apple doesn’t do a lot for PCs, but there is an iCloud client that will let you get at your Apple cloud-stored goodies. Hit the links below for the full rundown on how to get set up.

  • How to set up iCloud for Windows
  • How to use iCloud Drive on Windows
  • How to use iCloud Photos on Windows

Moving from another Windows PC

It’s a bit of a grind moving stuff from one PC to another, but you can make the cloud do most of the work for you. If you already use OneDrive, then great! If not, definitely sign up at least for the free account. 5GB of free storage isn’t a lot but it might help you move things around easier in the future, with the added bonus of being able to access files on mobile and on the web.

Simply put the files you want to move around into OneDrive on your old PC and once they’ve uploaded to the cloud you can get at them any time from your new one. Either through having OneDrive set up on your desktop or through the Windows 10 app.

Or you could just copy everything across using a USB thumb drive, memory card or DVD (provided your new computer actually has a DVD drive…). Like we used to in the old days.

As for your apps and games, everything from the Windows Store will be there to download again on your new PC. Software from outside of the Windows Store will have to be reinstalled manually from the discs or redownloaded from where you originally got it. The beauty to some Store apps is that your settings will be synced automatically, so you won’t even have to log in again — your Twitter, news, and other apps will pick right up where you left off!

First apps to get

The Store has a great selection of apps to download to your new PC. For most people though there will be some staples that they simply have to have. Others you might not yet realise how much you need them!

In any case, we’ve rounded up the best apps you should get on your new Windows 10 PC in one easy place!

Essential accessories

Whether you’re getting a laptop or a desktop, you’ll be looking for some great accessories to go with it. When it comes to laptops, an essential buy is a good bag to carry it around in and keep it safe.

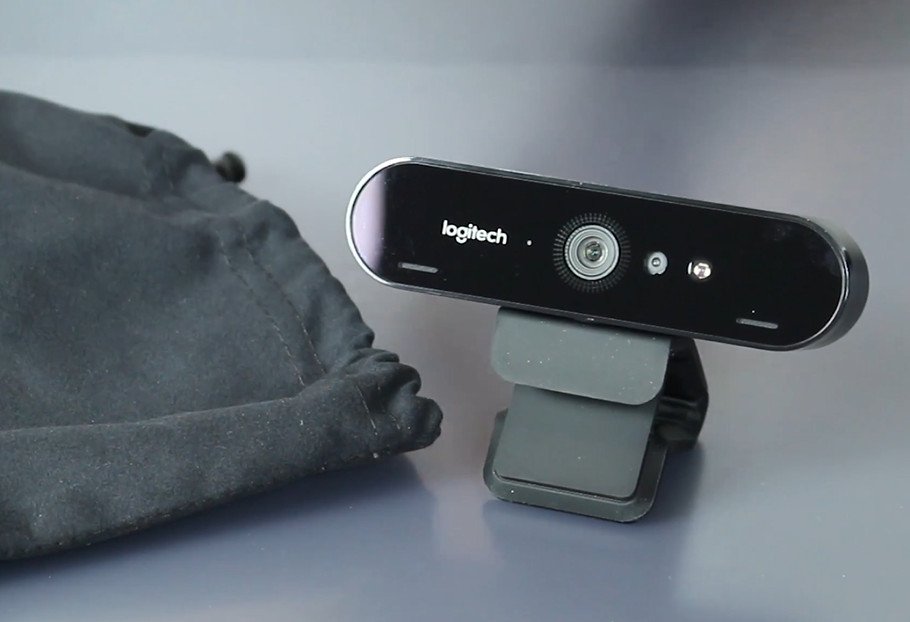
For the desktop crowd, mice, keyboards and webcams all rank towards the top of the list. Fortunately, whichever you’re looking for, we’ve got you covered with some great picks.

  • Best webcam for Windows
  • The best wireless mouse
  • The best ergonomic keyboards
  • 9 of the best laptop bags you can buy

Sign up and join our forums!

WC forums

While we endeavor to post as many helpful tips, tricks, news reports, rumors, reviews and much more on the home page, there’s a whole lot more knowledge available in the Windows Central forums! Whether you just want to chew the fat, share your own opinions or need some advice, you’ll find a large community of helpful enthusiasts there to guide you every single day.

Signing up is free, so head on over and join the discussion!

What is the Windows 10?

Windows 10 is an operating system from Microsoft Corporation for servers, desktop PCs, laptops, tablets, phones, and other connected devices (i.e. Internet of Things). The OS was formally announced on September 30, 2014, in San Francisco with Microsoft’s Joe Belfiore and Terry Myerson on stage. It was released worldwide on July 29, 2015.

Windows 10 for Phones was released as a Technical Preview on February 12, 2015 to various Lumia phones. The OS had the internal codename ‘Threshold’.

A Technical Preview for the OS was launched on October 1, 2014 by Microsoft for users to try an early version of Windows 10 for feedback. On January 21, 2015, Microsoft revealed the consumer side of Windows 10, including its plans for mobile and gaming. The final unveiling of Windows 10 took place during Microsoft’s Build 2015 conference.

Windows 10 ‘skips’ Windows 9 for its name for various reasons, including it being such a big update that it moves beyond just a single number upgrade.

Windows 10 gives users more choices between using the Start Screen (ideal for tablets and touch-screen devices) and the Start Menu (better suited for PCs and traditional laptops). A forthcoming feature called ‘Continuum’ lets the OS automatically switch between tablet and desktop mode depending on the presence (or absence) of a mouse and keyboard. Users can also override any settings, making the default Start Menu or Start Screen their choice.

Other features in Windows 10 include multiple desktop support, Modern apps are scalable on the desktop, new Start Menu (combo of traditional Start Menu plus room for Windows Apps), new task view button, new snapping options for apps, and improvements to file explorer for quickly finding files. These moves are largely considered to have been made by Microsoft to win over Windows 7 users who have not updated to Windows 8 due to unfamiliarity and a steeper learning curve.

For developers, there is application platform and one store for all the apps, which can run on all hardware, regardless of form-factor. These apps are called ‘universal apps’ because they can be run anywhere.

On March 30, 2016 during their annual Build conference, Microsoft announced a Windows 10 Anniversary Update that would come as a free upgrade to current users. The update includes new features thanks to feedback from Microsoft’s Windows Insider program.