How to properly remove a printer on Windows 10

Although on Windows 10, the process to install printers has improved over the years, we’re quickly moving into a digital world that has significantly reduced the need to print content on paper.

If you’re also taking the paperless route, you simply no longer use a particular printer, or you’re troubleshooting problems, you can use the Settings app, Control Panel, Print Management, Command Prompt, or even PowerShell to remove the printing device from your computer.

In this Windows 10 guide, we’ll walk you through five different ways to properly remove a printer from your device.

  • How to uninstall a printer using Settings
  • How to uninstall a printer using Control Panel
  • How to uninstall a printer using Print Management
  • How to uninstall a printer using Command Prompt
  • How to uninstall a printer using PowerShell

How to uninstall a printer using Settings

If you’re no longer using a particular printer, you can uninstall the device using these steps:

  1. Open Settings.
  2. Click on Devices.
  3. Click on Printers & scanners.
  4. Select the printer and click the Remove device button.
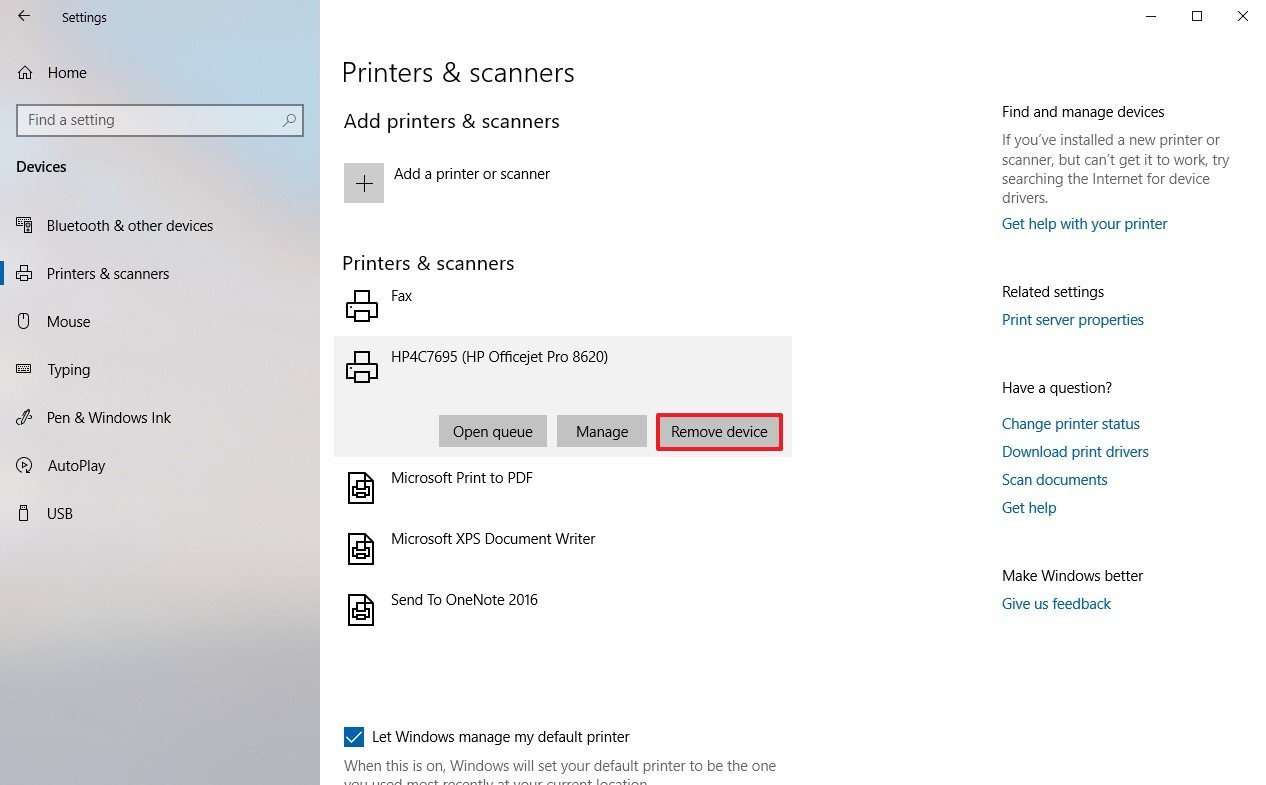
  5. Click the Yes button to confirm.

Once you’ve completed the steps, the printer will be removed from your device.

Uninstalling printer software

If you’re only using the printer with the basic driver, there’s nothing else to remove. However, if you’re using a third-party utility, or if the Settings app also installed additional tools to manage the printer automatically, you’ll need to remove the remaining software manually.

To remove left behind printer-related applications, use these steps:

  1. Open Settings.
  2. Click on Apps.
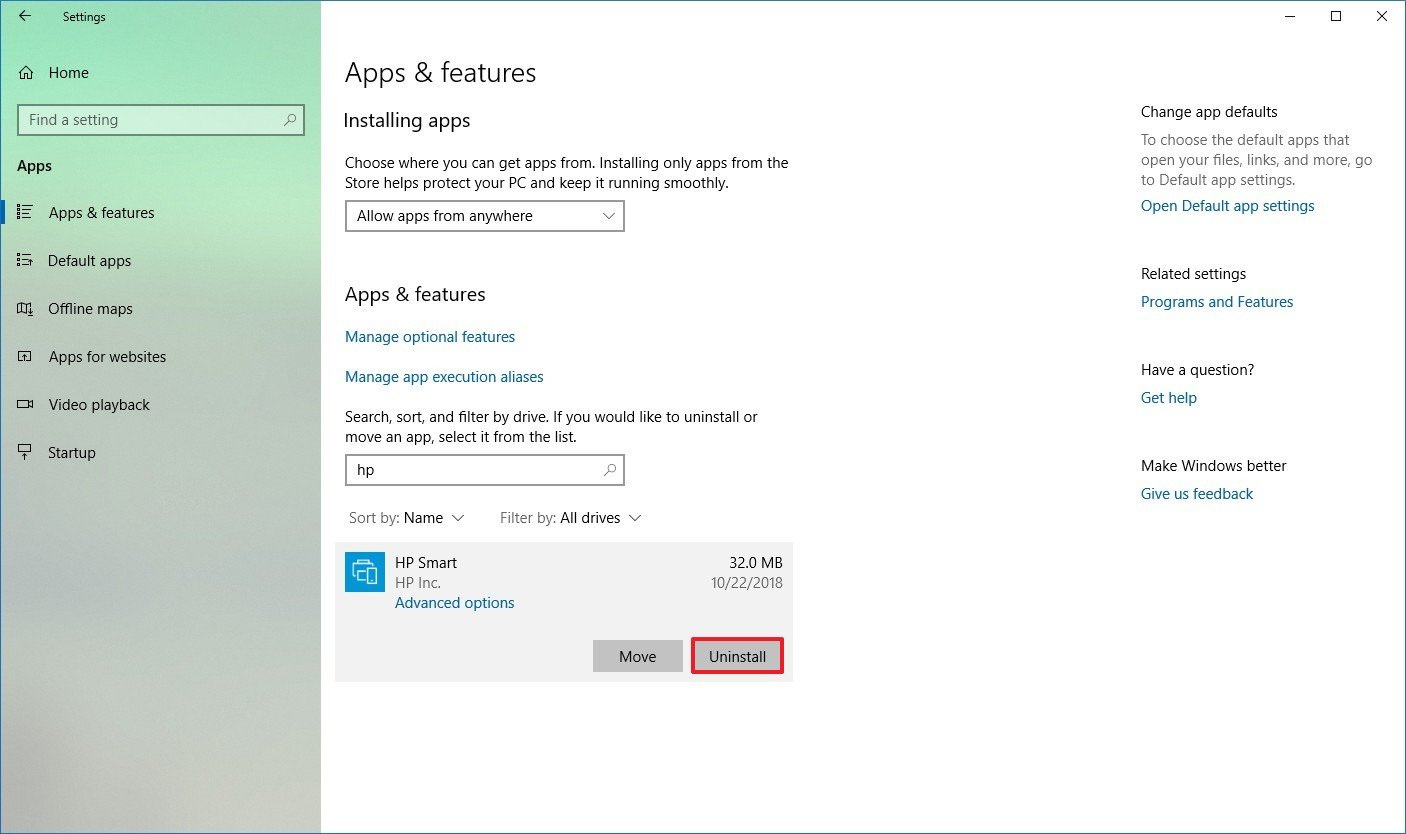
  3. Click on Apps & features.
  4. Select the software you want to remove.
  5. Click the Uninstall button.

  6. Continue with the on-screen directions to complete the removal.

How to uninstall a printer using Control Panel

Alternatively, you can still uninstall a printing device using Control Panel with these steps:

  1. Open Control Panel.
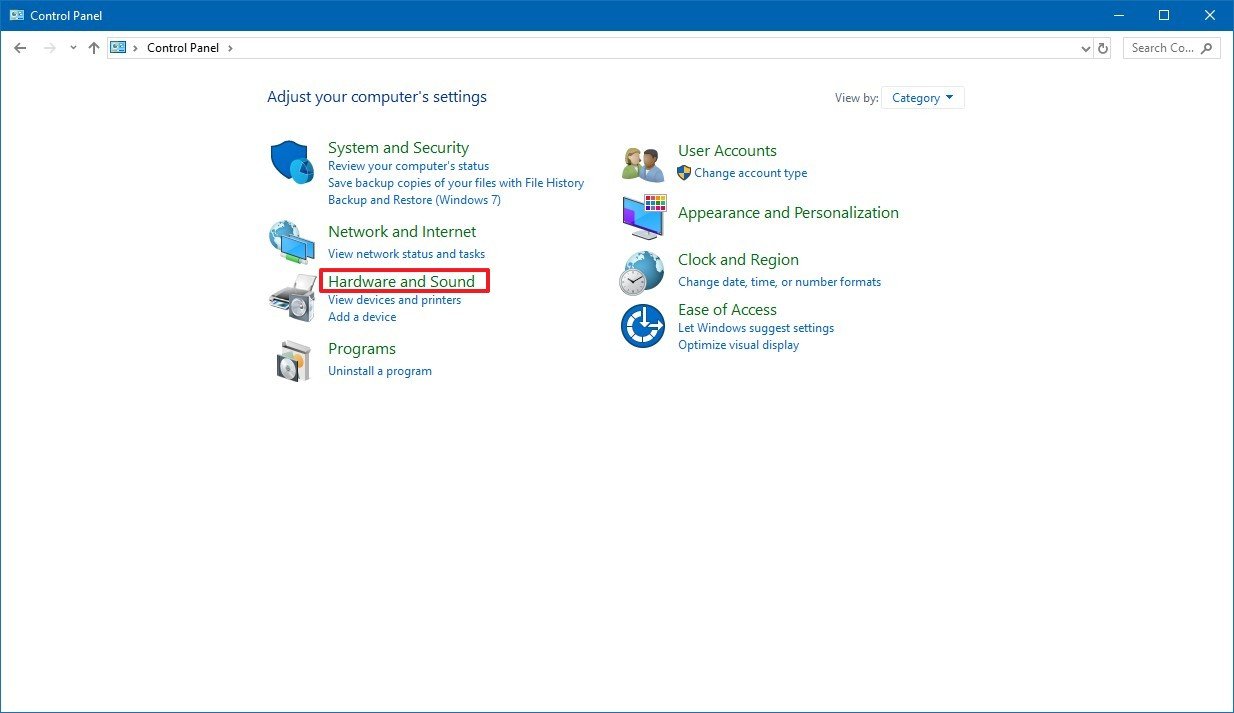
  2. Click on Hardware and Sound.

  3. Click on Devices and Printers.

  4. Under the “Printers” section, right-click the device you want, and select the Remove device option.
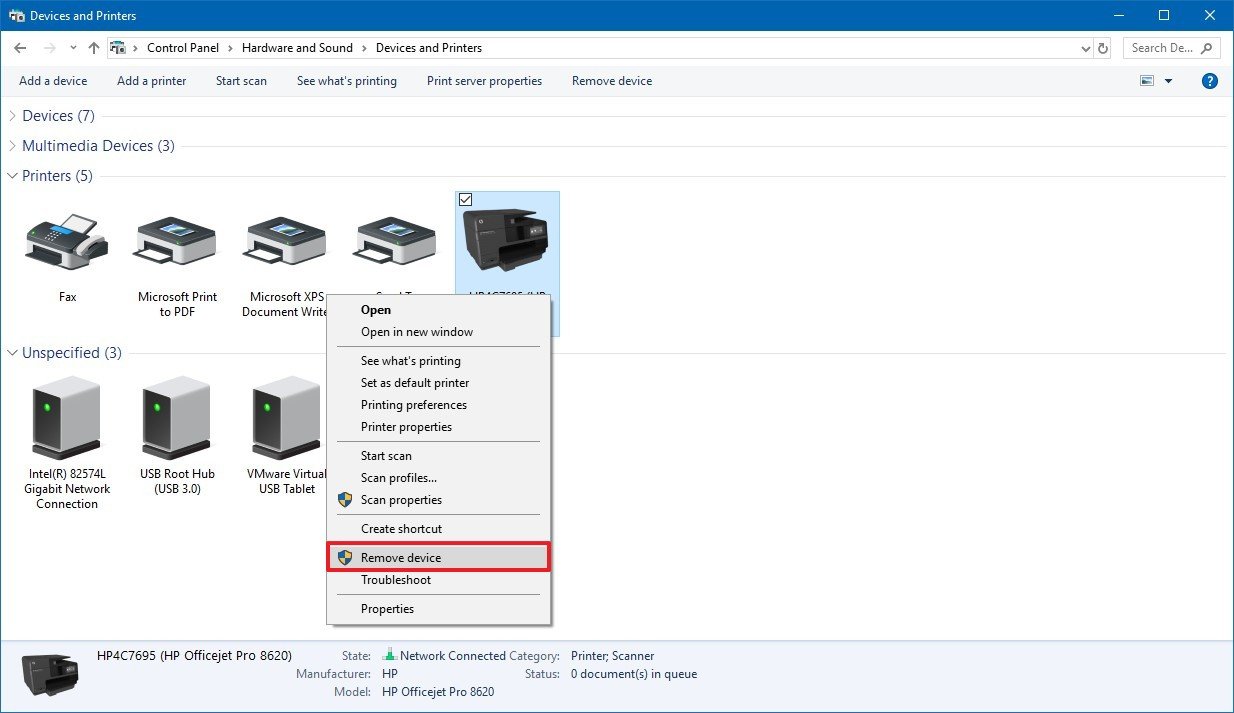
  5. Click the Yes button to confirm.

Once you’ve completed the steps, the printer in question will no longer be available on your device.

Uninstalling printer software

To remove left behind printer-related applications, use these steps:

  1. Open Settings.
  2. Click on Apps.
  3. Click on Apps & features.
  4. Select the software you want to remove.
  5. Click the Uninstall button.

  6. Continue with the on-screen directions to complete the removal.

How to uninstall a printer using Print Management

On Windows 10, you can also use the Print Management console to remove a printer you no longer use with these steps:

  1. Open Control Panel.
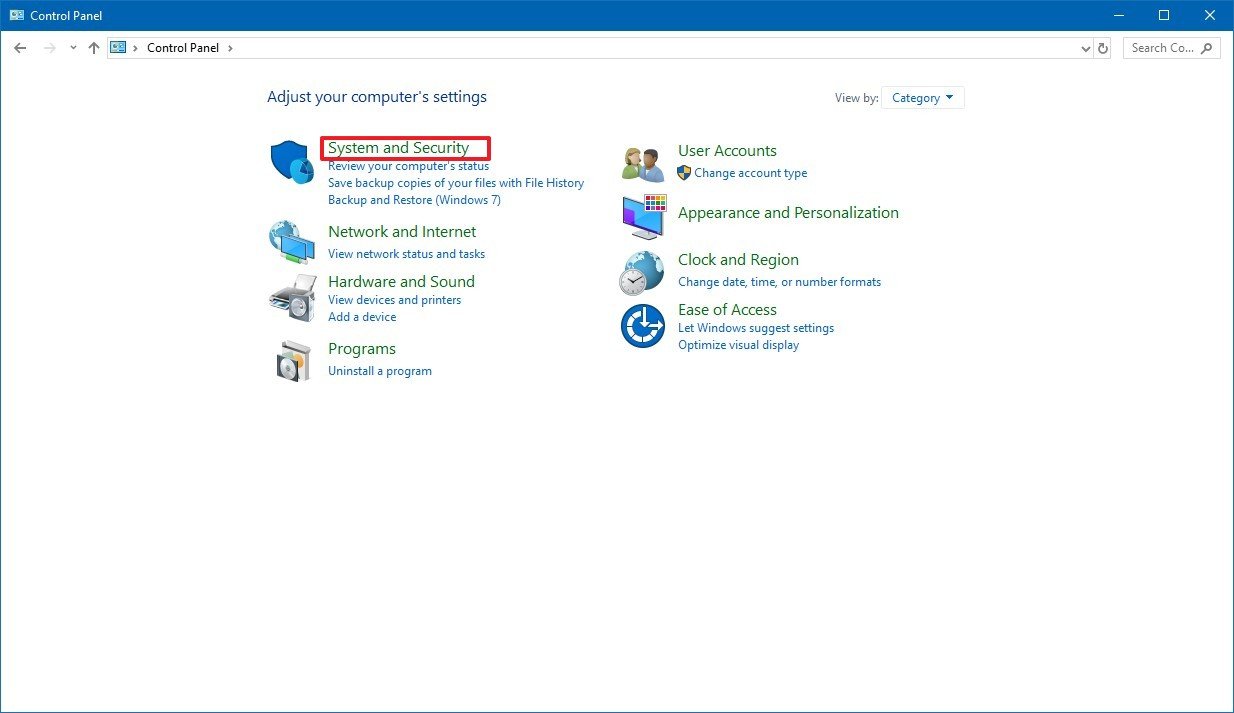
  2. Click on System and Security.

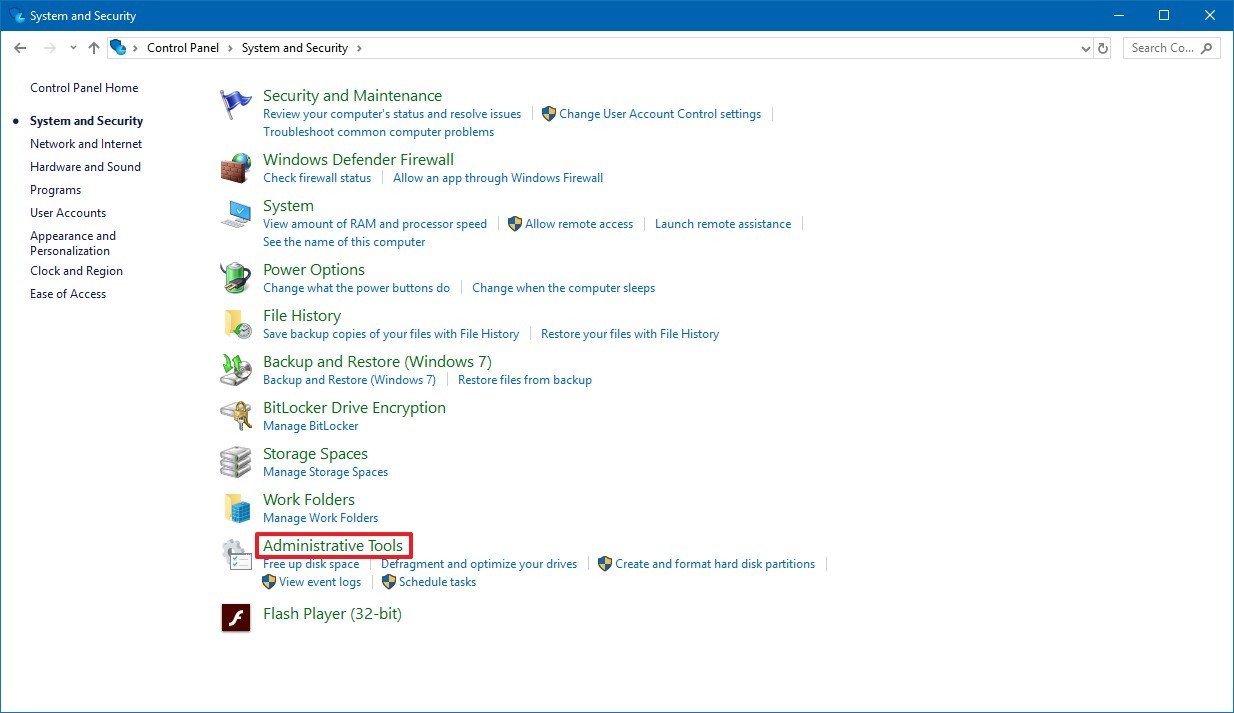
  3. Click on Administrative Tools.

  4. Double-click the Print Management shortcut.
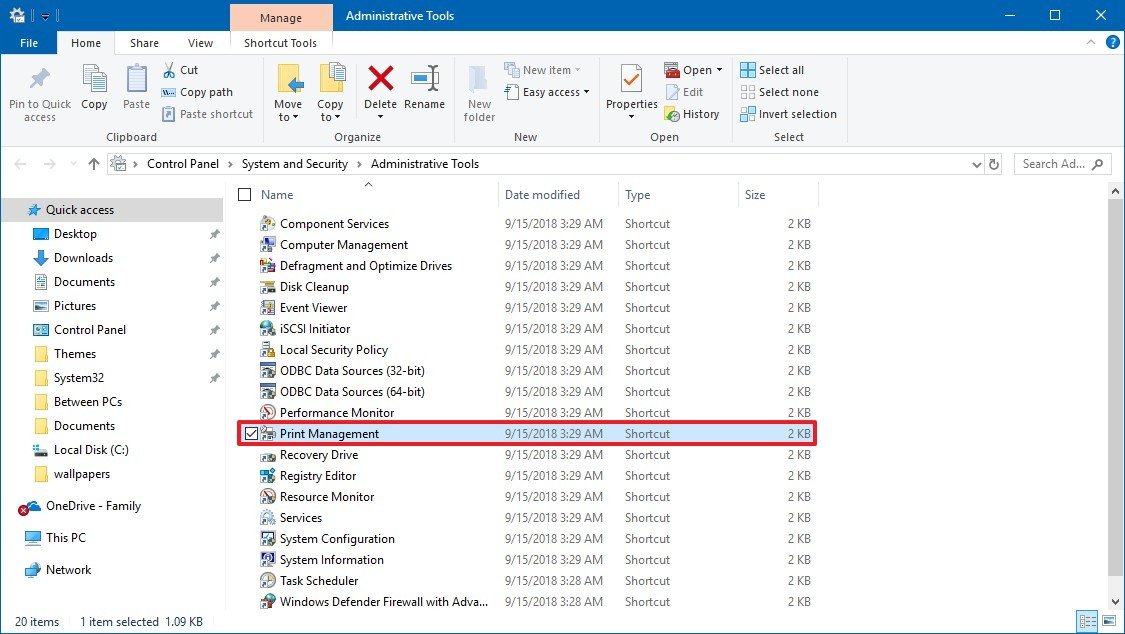
  5. Under “Custom Filters,” click on All Printers.
  6. Right-click the printer that you want to remove, and select the Delete option.
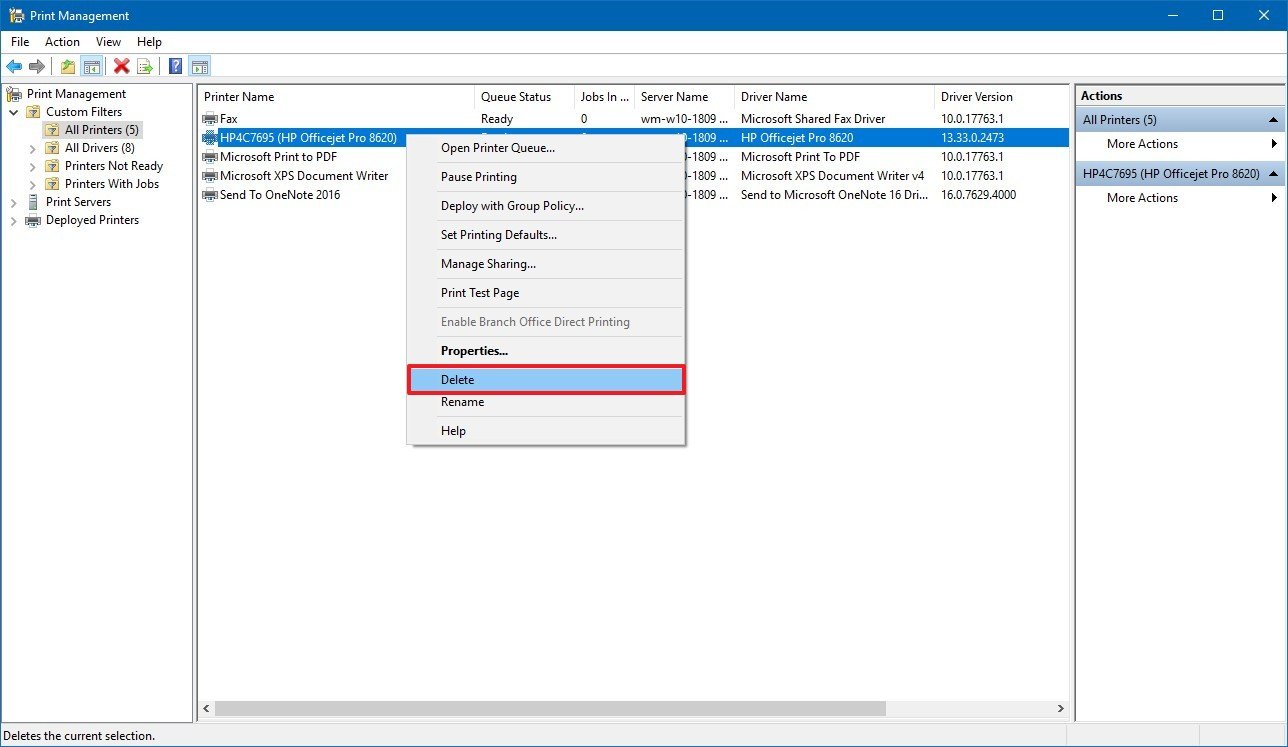
  7. Click the Yes button.

After completing the steps, the printer that you removed will no longer be available to any user.

Uninstalling printer software

To remove left behind printer-related applications, use these steps:

  1. Open Settings.
  2. Click on Apps.
  3. Click on Apps & features.
  4. Select the software you want to remove.
  5. Click the Uninstall button.

  6. Continue with the on-screen directions to complete the removal.

How to uninstall a printer using Command Prompt

If you prefer using command lines, you can use Command Prompt to delete a printer from Windows 10 using these steps:

  1. Open Start.
  2. Search for Command Prompt, right-click the top result, and select the Run as administrator option.
  3. Type the following command to queue a list of printers on your device and press Enter:

    wmic printer get name

  4. Type the following command to uninstall the printer and press Enter:

    printui.exe /dl /n "YOUR-PRINTER-NAME"

    In the command, replace the YOUR-PRINTER-NAME with the full name of your printer see step No. 3.
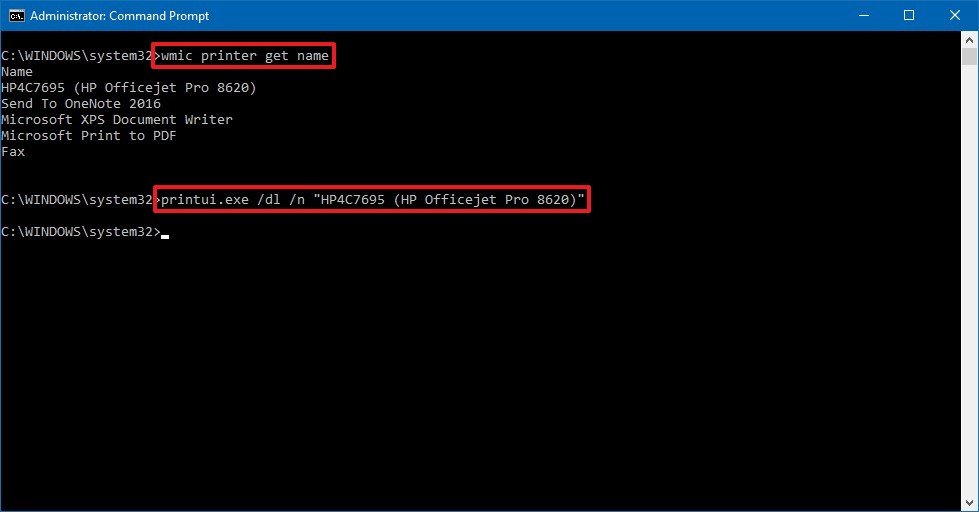
Once you’ve completed the steps, the printer that you specified in the command will be uninstalled.

Uninstalling printer software

To remove left behind printer-related applications, use these steps:

  1. Open Settings.
  2. Click on Apps.
  3. Click on Apps & features.
  4. Select the software you want to remove.
  5. Click the Uninstall button.

  6. Continue with the on-screen directions to complete the removal.

How to uninstall a printer using PowerShell

If you prefer to use PowerShell, you can use these steps to remove a printer from Windows 10:

  1. Open Start.
  2. Search for Windows PowerShell, right-click the top result, and select the Run as administrator option.
  3. Type the following command to queue a list of printers on your device and press Enter:

    Get-Printer | Format-List Name

  4. Type the following command to uninstall the printer and press Enter:

    Remove-Printer -Name "YOUR-PRINTER-NAME"
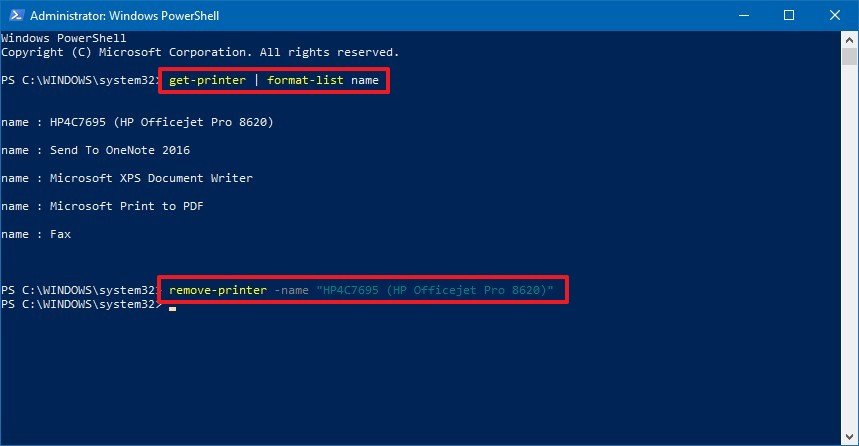
    In the command, replace the YOUR-PRINTER-NAME with the full name of your printer see step No. 3.

After completing the steps, the printer that you selected will be removed from your computer.

Uninstalling printer software

To remove left behind printer-related applications, use these steps:

  1. Open Settings.
  2. Click on Apps.
  3. Click on Apps & features.
  4. Select the software that you want to remove.
  5. Click the Uninstall button.

  6. Continue with the on-screen directions to complete the removal.
How to enable ‘Boot Log’ on Windows 10

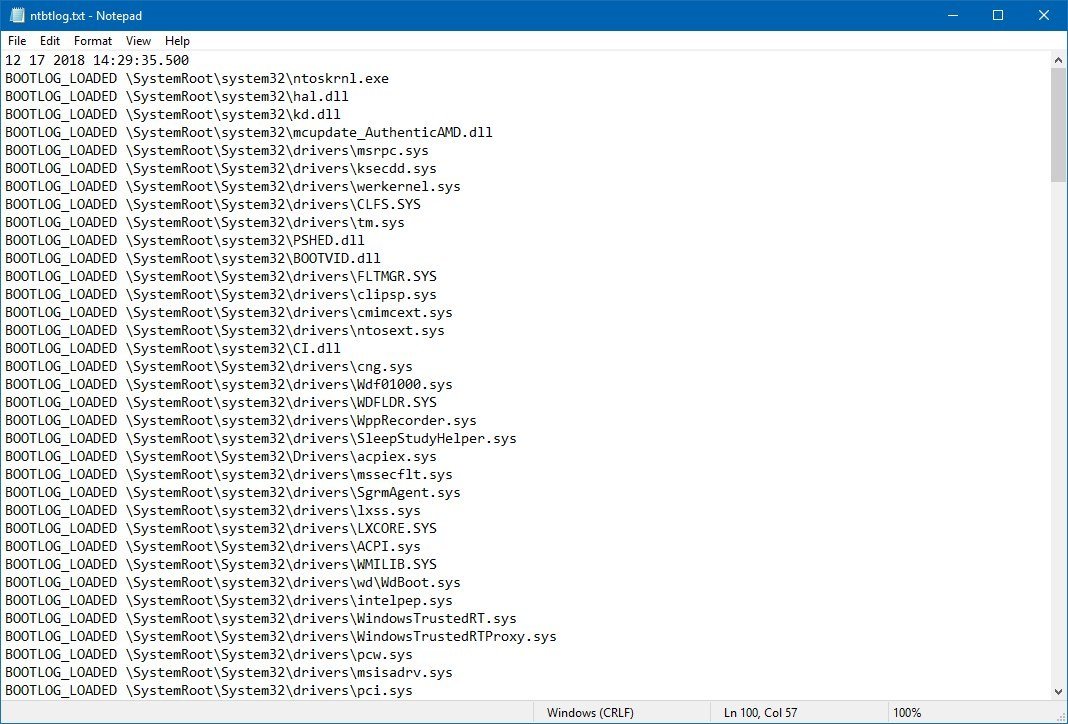
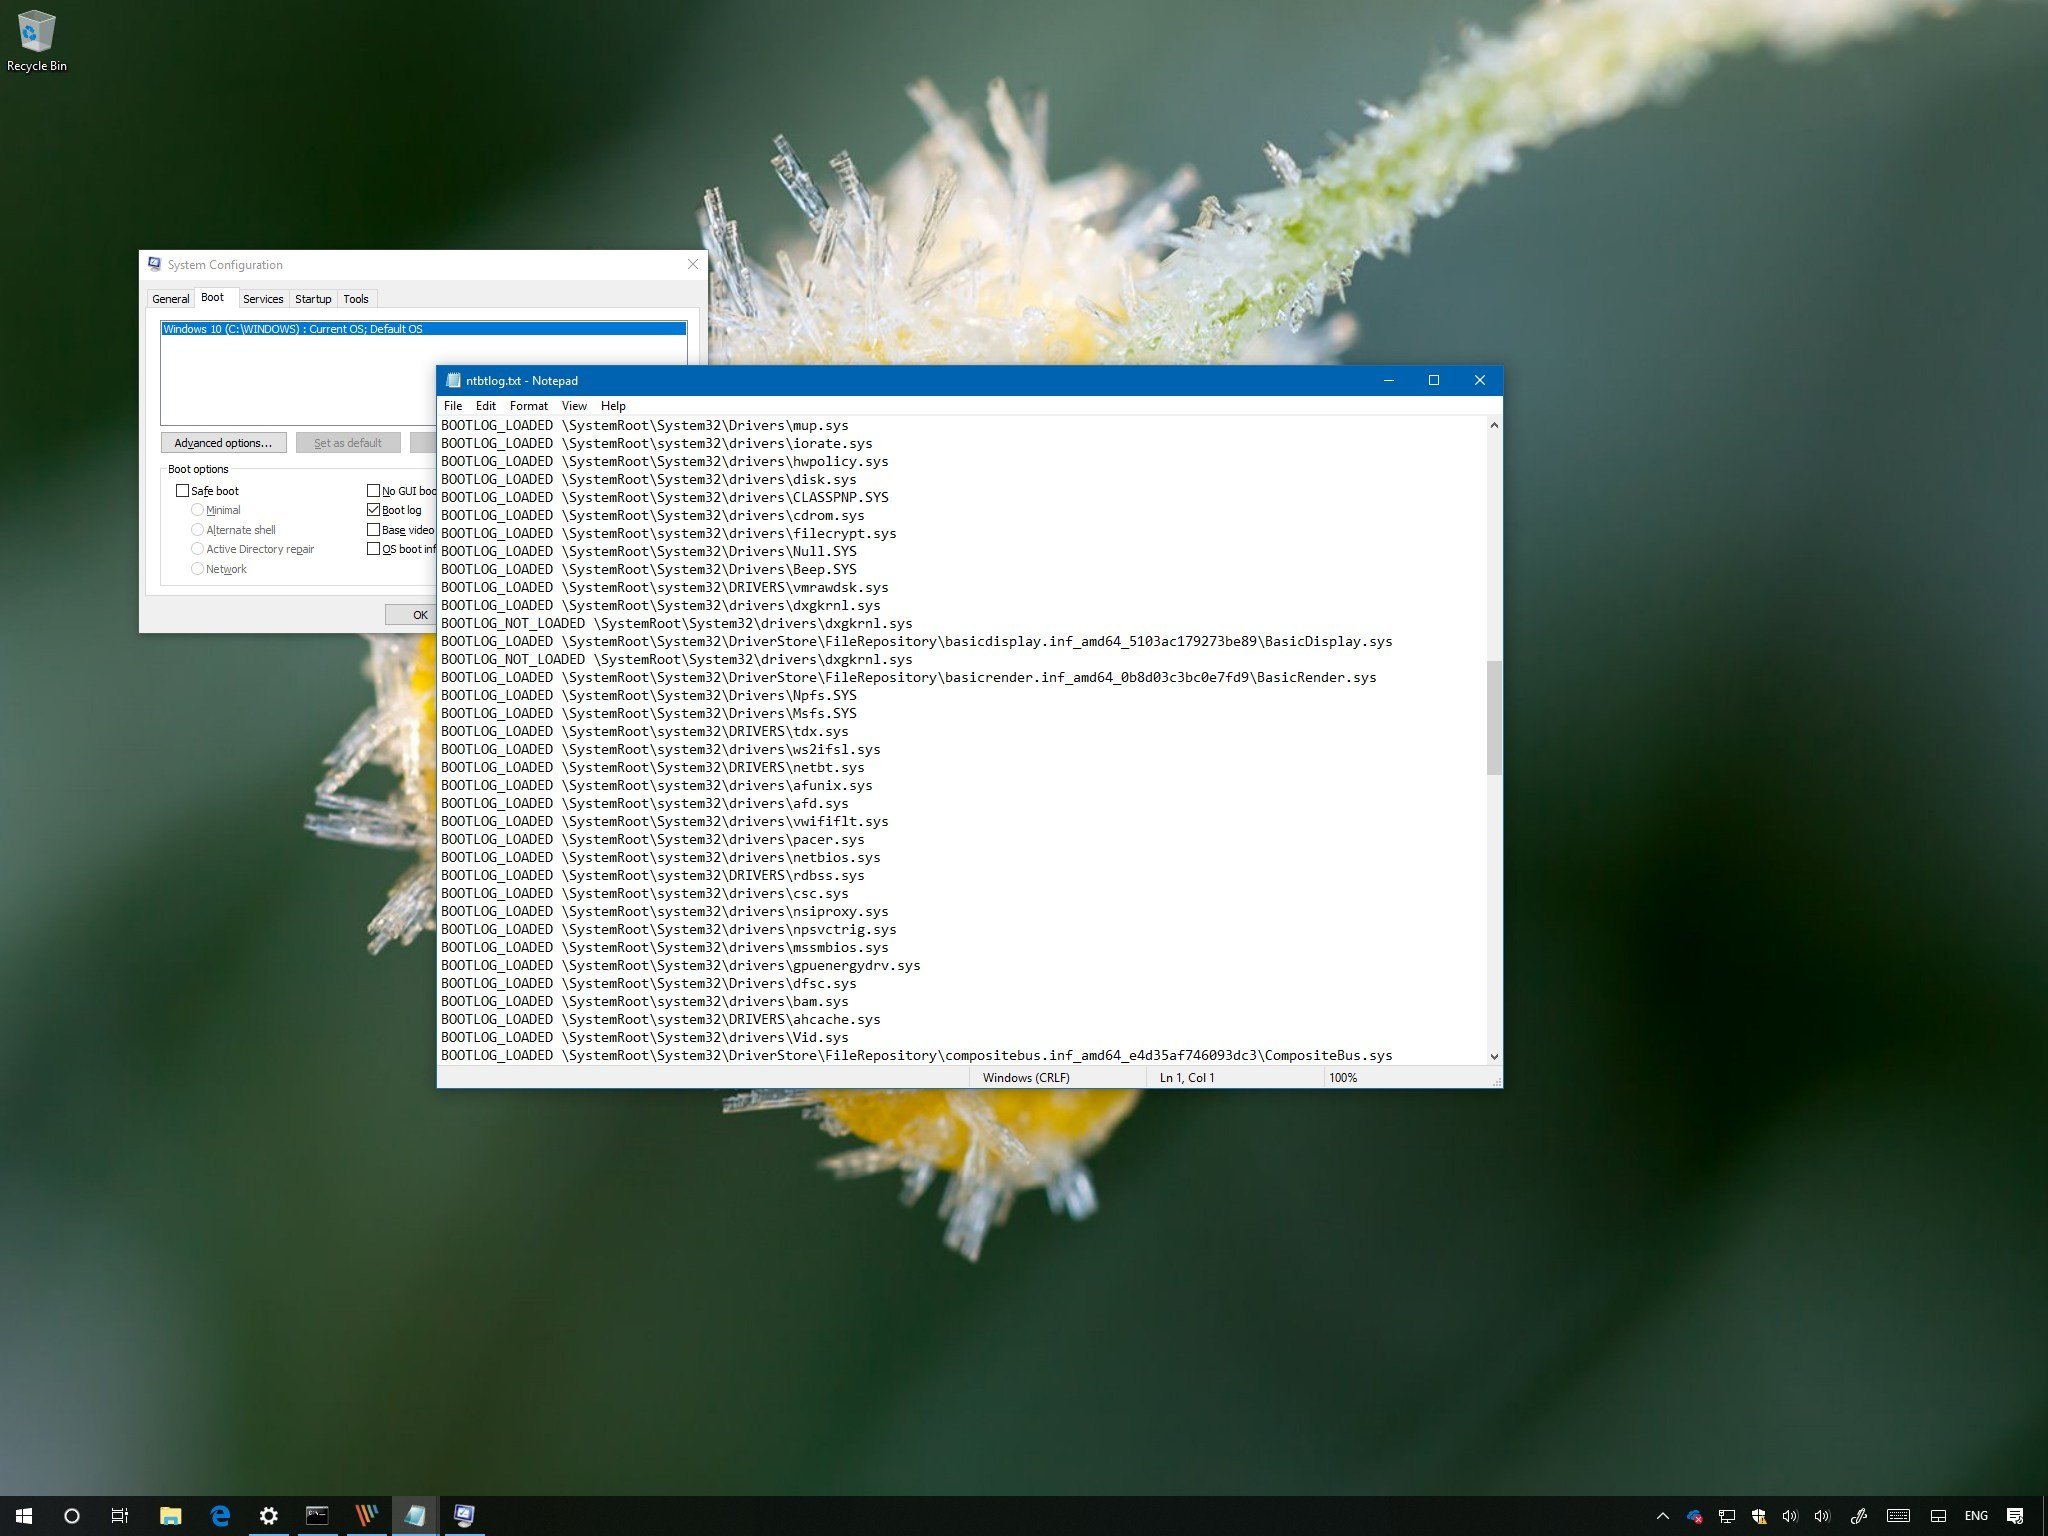
On Windows 10, when you’re having driver issues, you can enable the “Boot Log” option to create a special ntbtlog.txt file that includes a detailed list of the loaded and unloaded drivers during boot.

The option won’t fix any problems your device may be experiencing, but you can analyze this information to understand what might be preventing Windows 10 from loading correctly to find an appropriate fix.

In this Windows 10 guide, we walk you through the steps to enable “Boot Log” to collect information about the loaded and not loaded drivers during startup using System Configuration and Command Prompt.

  • How to enable ‘Boot log’ using System Configuration
  • How to enable ‘Boot log’ using Command Prompt

How to enable ‘Boot log’ using System Configuration

To log driver information during boot using System Configuration, use these steps:

  1. Open Start.
  2. Search for System Configuration and click the top result to open the experience.(Quick Tip: You can also use the Windows key + R keyboard shortcut to open the Run command, enter the msconfig command, and click OK to open System Information.)
  3. Click on the Boot tab.
  4. Check the Boot log option.
  5. Click the Apply button.
  6. Click the OK button.
  7. Click the Restart button.

Once you complete these steps, a special log file will be created with the drivers that were loaded, including those that were omitted.

Viewing the ntbtlog text file

To find and view the ntbtlog.txt file, use these steps:

  1. Use the Windows key + R keyboard shortcut to open the Run command.
  2. Type the following file path:c:\Windows\ntbtlog.txt
  3. Click the OK button.

In the text file, you can see a list of loaded and unloaded drivers during boot, which you can now use in your troubleshooting process to fix a related issue.

If you no longer need the “Boot Log,” you can disable the feature using the same instructions mentioned above, but on step No. 4, make sure to clear the option.

How to enable ‘Boot log’ using Command Prompt

To log driver information during boot using Command Prompt, use these steps:

  1. Open Start.
  2. Search for Command Prompt, right-click the top result, and select the Run as administrator option.
  3. Type the following command and press Enter:bcdedit
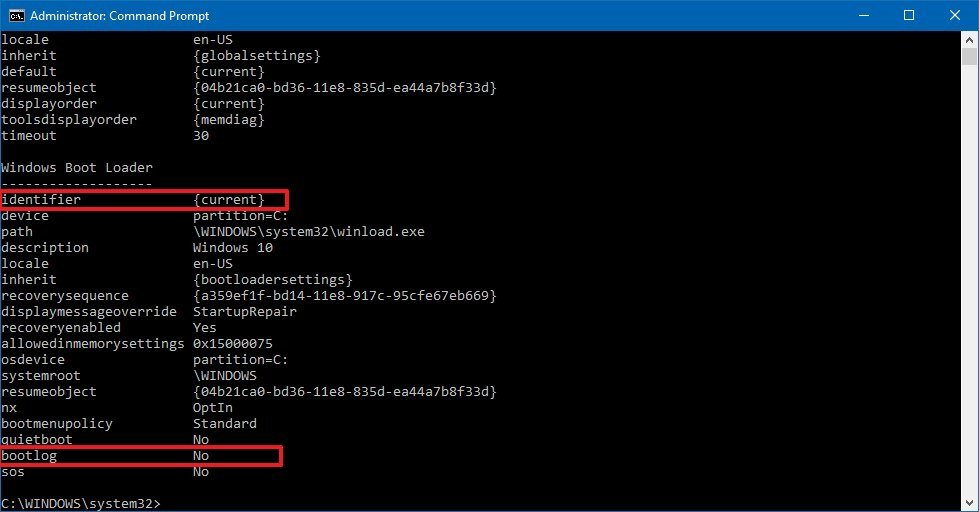
  4. Under the “Windows Boot Loader” section, note the “identifier” and “bootlog” information. For example:
    • identifier — {current}.
    • bootlog — No.
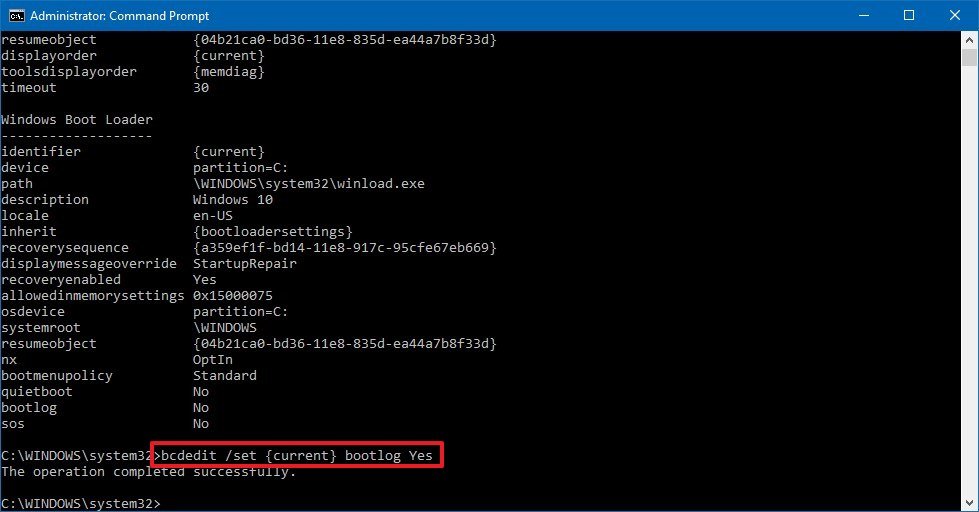
  5. Type the following command to enable logs during boot and press Enter:bcdedit /set {current} bootlog Yes

    In the command, make sure to replace {current} with the information in your identifier.

After completing the steps, a log file will be created in the Windows folder with the drivers that were loaded, including those that were not loaded.

Viewing the ntbtlog text file

To find and view the “Boot Log” file, use these steps:

  1. Use the Windows key + R keyboard shortcut to open the Run command.
  2. Type the following file path:c:\Windows\ntbtlog.txt
  3. Click the OK button.

In the text file, you can see information about drivers that Windows 10 loaded and didn’t load during the boot process, which you can now use in your troubleshooting process to resolve a related problem.

You can always revert the changes using the same instructions outlined above, but on step No. 5, make sure to use this command: bcdedit /set {current} bootlog No.

Although this guide is focused on Windows 10, the “Boot Log” option has been available for years, and you can also use the same instructions on Windows 8.1 and Windows 7.

What is the Windows 10?

Windows 10 is an operating system from Microsoft Corporation for servers, desktop PCs, laptops, tablets, phones, and other connected devices (i.e. Internet of Things). The OS was formally announced on September 30, 2014, in San Francisco with Microsoft’s Joe Belfiore and Terry Myerson on stage. It was released worldwide on July 29, 2015.

Windows 10 for Phones was released as a Technical Preview on February 12, 2015 to various Lumia phones. The OS had the internal codename ‘Threshold’.

A Technical Preview for the OS was launched on October 1, 2014 by Microsoft for users to try an early version of Windows 10 for feedback. On January 21, 2015, Microsoft revealed the consumer side of Windows 10, including its plans for mobile and gaming. The final unveiling of Windows 10 took place during Microsoft’s Build 2015 conference.

Windows 10 ‘skips’ Windows 9 for its name for various reasons, including it being such a big update that it moves beyond just a single number upgrade.

Windows 10 gives users more choices between using the Start Screen (ideal for tablets and touch-screen devices) and the Start Menu (better suited for PCs and traditional laptops). A forthcoming feature called ‘Continuum’ lets the OS automatically switch between tablet and desktop mode depending on the presence (or absence) of a mouse and keyboard. Users can also override any settings, making the default Start Menu or Start Screen their choice.

Other features in Windows 10 include multiple desktop support, Modern apps are scalable on the desktop, new Start Menu (combo of traditional Start Menu plus room for Windows Apps), new task view button, new snapping options for apps, and improvements to file explorer for quickly finding files. These moves are largely considered to have been made by Microsoft to win over Windows 7 users who have not updated to Windows 8 due to unfamiliarity and a steeper learning curve.

For developers, there is application platform and one store for all the apps, which can run on all hardware, regardless of form-factor. These apps are called ‘universal apps’ because they can be run anywhere.

On March 30, 2016 during their annual Build conference, Microsoft announced a Windows 10 Anniversary Update that would come as a free upgrade to current users. The update includes new features thanks to feedback from Microsoft’s Windows Insider program.

8 quick ways to clear up drive space in Windows 10

Bumping up against your PC’s physical storage limit? Here’s how to grab a couple gigs’ worth of space.

Face it: No matter how large your hard drive is — how many empty terabytes you had when you first bought your PC — you always seem to fill it right to the brink.

If you’re bumping up against your PC’s physical storage limit, there are some quick tricks you can use to reclaim a couple of gigs. But these options will only take you so far — if you need a lot of space, you may need to upgrade your hardware or consider deleting a few of those raw image files.

Empty the Recycle Bin

When you delete items, like files and photos, from your PC, they don’t immediately get deleted. Instead, they sit in the Recycle Bin and continue to take up valuable hard-drive space. To empty the Recycle Bin, go to your desktop, right-click on the Recycle Bin and click Empty Recycle Bin. You will see a warning pop-up asking if you are sure you want to permanently delete your Recycle Bin items. Click Yes to proceed.

Disk Cleanup

Windows has a built-in disk cleanup utility (aptly named Disk Cleanup) that can help you clear up space by removing various files — including temporary internet files, system error memory dump files, and even previous Windows installations that may still be hanging out from your recent move to Windows 10.

You can find Disk Cleanup in the Start menu, under All apps > Windows Administrative Tools > Disk Cleanup. Select the drive you want to clean up and hit OK, then wait while Disk Cleanup calculates how much space you can free up. If you want to delete system files, such as the Windows.old folder (which holds your previous installations of Windows, and can be several GB in size), click Cleanup system files.

Delete temporary and downloaded files

You can delete temporary files without running Disk Cleanup, along with files you downloaded that you may no longer need. Go to Settings > System and click on Storage on the left panel. Next, click This PC at the top and then click Temporary files from the list. Check the boxes for Temporary files and Downloads folder (and Empty recycle bin while you’re at it) and then click the Remove files button.

Turn on Storage Sense

If you have updated to Windows 10 Creators Update, then let Windows help out with freeing up disk space. Head back to the Storage page in Settings and toggle on Storage sense. Now, Windows will automatically delete unused temporary files, as well as files that have been in the Recycle Bin for more than 30 days. I’m pretty good with emptying the Recycle Bin on something approaching a regular schedule, but I’m also very happy to have Windows track down and eradicate needless temp files.

Save files to a different drive

If your computer has multiple hard drives or a partitioned hard drive, you may find yourself running out of space on one drive (or partition). Luckily, you can fix this by changing your default save locations for apps, documents, music, pictures, and videos. To do this, open the Settings menu and go to System > Storage. Under Save locations, select a different drive for each of the categories. You can select any drive — even a removable drive, like a USB flash drive or a memory card — that is connected to your PC.

Disable hibernate

Instead of shutting down your computer completely, you can put it in hibernate — a quasi-shutdown state that allows you to startup faster. When your computer goes into hibernate, it saves a snapshot of your files and drivers before shutting down, and this takes up space. If starting up quickly isn’t your priority, you can reclaim some valuable hard drive space by disabling hibernate altogether, because the hiberfil.sys file takes up 75 percent of your PC’s installed RAM. This means that if you have 8GB of RAM, you can clear up 6GB instantly by disabling hibernate.

Here’s our complete guide on disabling (or re-enabling) hibernate in Windows 10. One caveat: If you disable hibernate, you will not be able to use Windows 10’s fast startup feature.

Uninstall apps

You probably have some apps and programs on your PC that you don’t use — either apps you’ve installed and forgotten about, or bloatware that came preinstalled on your computer from the manufacturer. To find out which apps are taking up space, open the Settings menu and go to System > Apps & features and choose Sort by size. To uninstall an app from this menu, click the app and then click Uninstall.

If you’re running legacy programs on Windows 10, you may not see them in this list (some appear, but some do not). To find these programs, right-click the Start button and click Control Panel. Go to Programs and Features to see a list of the legacy programs on your computer (you can also sort this list by program size). To uninstall a program from this list, left-click it to select it and click Uninstall.

Windows 10’s default apps — like the Maps app, OneNote app, and Photos app — don’t take up a lot of space, but they do take up some space.

Store files in the cloud — and only in the cloud

If you take advantage of cloud storage via OneDrive or another service, you’re probably double-storing files and photos. Well, you don’t have to do this — all cloud storage services allow you to select which folders are actually downloaded and saved to your PC (as well as in the cloud).

Right-click on the OneDrive icon in your system tray and choose Settings. In the Account tab, next to Choose folders to sync to this device, click Choose folders. Select the folders you want to sync (read: save directly) to your device, and deselect any folders you do not want to sync to your device. When you’re finished selecting or deselecting folders, click OK. The folders you did not select to sync to your device will be removed from your hard drive, freeing up space. You will still be able to access the files in these folders from the OneDrive site in any Web browser; they just won’t be saved on your hard drive.

8 quick ways to clear up drive space in Windows 10

Bumping up against your PC’s physical storage limit? Here’s how to grab a couple gigs’ worth of space.

Face it: No matter how large your hard drive is — how many empty terabytes you had when you first bought your PC — you always seem to fill it right to the brink.

If you’re bumping up against your PC’s physical storage limit, there are some quick tricks you can use to reclaim a couple of gigs. But these options will only take you so far — if you need a lot of space, you may need to upgrade your hardware or consider deleting a few of those raw image files.

Empty the Recycle Bin

When you delete items, like files and photos, from your PC, they don’t immediately get deleted. Instead, they sit in the Recycle Bin and continue to take up valuable hard-drive space. To empty the Recycle Bin, go to your desktop, right-click on the Recycle Bin and click Empty Recycle Bin. You will see a warning pop-up asking if you are sure you want to permanently delete your Recycle Bin items. Click Yes to proceed.

Disk Cleanup

Windows has a built-in disk cleanup utility (aptly named Disk Cleanup) that can help you clear up space by removing various files — including temporary internet files, system error memory dump files, and even previous Windows installations that may still be hanging out from your recent move to Windows 10.

You can find Disk Cleanup in the Start menu, under All apps > Windows Administrative Tools > Disk Cleanup. Select the drive you want to clean up and hit OK, then wait while Disk Cleanup calculates how much space you can free up. If you want to delete system files, such as the Windows.old folder (which holds your previous installations of Windows, and can be several GB in size), click Cleanup system files.

Delete temporary and downloaded files

You can delete temporary files without running Disk Cleanup, along with files you downloaded that you may no longer need. Go to Settings > System and click on Storage on the left panel. Next, click This PC at the top and then click Temporary files from the list. Check the boxes for Temporary files and Downloads folder (and Empty recycle bin while you’re at it) and then click the Remove files button.

Turn on Storage Sense

If you have updated to Windows 10 Creators Update, then let Windows help out with freeing up disk space. Head back to the Storage page in Settings and toggle on Storage sense. Now, Windows will automatically delete unused temporary files, as well as files that have been in the Recycle Bin for more than 30 days. I’m pretty good with emptying the Recycle Bin on something approaching a regular schedule, but I’m also very happy to have Windows track down and eradicate needless temp files.

Save files to a different drive

If your computer has multiple hard drives or a partitioned hard drive, you may find yourself running out of space on one drive (or partition). Luckily, you can fix this by changing your default save locations for apps, documents, music, pictures, and videos. To do this, open the Settings menu and go to System > Storage. Under Save locations, select a different drive for each of the categories. You can select any drive — even a removable drive, like a USB flash drive or a memory card — that is connected to your PC.

Disable hibernate

Instead of shutting down your computer completely, you can put it in hibernate — a quasi-shutdown state that allows you to startup faster. When your computer goes into hibernate, it saves a snapshot of your files and drivers before shutting down, and this takes up space. If starting up quickly isn’t your priority, you can reclaim some valuable hard drive space by disabling hibernate altogether, because the hiberfil.sys file takes up 75 percent of your PC’s installed RAM. This means that if you have 8GB of RAM, you can clear up 6GB instantly by disabling hibernate.

Here’s our complete guide on disabling (or re-enabling) hibernate in Windows 10. One caveat: If you disable hibernate, you will not be able to use Windows 10’s fast startup feature.

Uninstall apps

You probably have some apps and programs on your PC that you don’t use — either apps you’ve installed and forgotten about, or bloatware that came preinstalled on your computer from the manufacturer. To find out which apps are taking up space, open the Settings menu and go to System > Apps & features and choose Sort by size. To uninstall an app from this menu, click the app and then click Uninstall.

If you’re running legacy programs on Windows 10, you may not see them in this list (some appear, but some do not). To find these programs, right-click the Start button and click Control Panel. Go to Programs and Features to see a list of the legacy programs on your computer (you can also sort this list by program size). To uninstall a program from this list, left-click it to select it and click Uninstall.

Store files in the cloud — and only in the cloud

If you take advantage of cloud storage via OneDrive or another service, you’re probably double-storing files and photos. Well, you don’t have to do this — all cloud storage services allow you to select which folders are actually downloaded and saved to your PC (as well as in the cloud).

Right-click on the OneDrive icon in your system tray and choose Settings. In the Account tab, next to Choose folders to sync to this device, click Choose folders. Select the folders you want to sync (read: save directly) to your device, and deselect any folders you do not want to sync to your device. When you’re finished selecting or deselecting folders, click OK. The folders you did not select to sync to your device will be removed from your hard drive, freeing up space. You will still be able to access the files in these folders from the OneDrive site in any Web browser; they just won’t be saved on your hard drive.

dell PA-5M10 power adapter Dell XPS 17 150W Slim AC Power Adapter Supply Charger
Motorola SPN5632B power adapter Motorola Xoom 1 Table
Dell 74X5J power adapter Dell Alienware M14x M15x M17x
Lenovo ADS-25SGP-06 power adapter Lenovo ideapad 100S-11IBY 80R2003UUS
Microsoft 0D130G00GXS58 power adapter Microsoft Surface pro 4 1749 Docking Station

Windows 10 Fall Creators Update: the 10 best new features

Microsoft has been testing its latest Windows 10 Fall Creators Update over the past six months, and it’s now ready to roll out to existing machines today. While Microsoft’s “Creators Update” naming extends to this latest Windows 10 update, a lot of the features are new additions that will be used by all Windows users. Microsoft is officially launching its Windows Mixed Reality (VR) headsets with the Fall Creators Update, and it’s finally bringing its contact integration to the Windows 10 task bar.

Most of the improvements in the Fall Creators Update are minor, and some have even been delayed until a future update. Microsoft is also starting to tweak the overall look and feel of Windows 10 with its new Fluent Design in the Fall Creators Update. You’ll see some of those subtle changes and animations if you update your PC today, and more will be coming next year. I’ve been testing Windows 10’s Fall Creators Update for the past six months, and these are my favorite new features coming to Windows.

ONEDRIVE FILES ON-DEMAND

Microsoft is bringing back placeholder files for OneDrive with the Fall Creators Update. A new on-demand feature lets OneDrive pick out data from the cloud when it’s needed, without having to sync full files and folders to a device. OneDrive Files On-Demand will only download files when you need them, and File Explorer will show what files are available locally, or if they’ll need to be downloaded from the cloud. Apps can even sync files from OneDrive, and you’ll get a notification showing their download progress.

It’s a great improvement over the old method of having to sync entire folders for offline usage, and any files you open will now be automatically synced offline until you run out of disk space.

PEOPLE INTEGRATION

My People is Microsoft’s method of making the static Windows 10 task bar a little more personal. You can now pin friends, co-workers, or family members to the task bar, for quick access to contact details. You can even use Skype to call or message a contact from the task bar, and emoji and messages will pop up during conversations. The most useful part of this people integration is the ability to drag and drop things like pictures directly onto a contact and share them easily.

WINDOWS MIXED REALITY

Microsoft’s answer to virtual reality, Windows Mixed Reality, is now available with the Fall Creators Update. To use Mixed Reality you’ll need to purchase a separate headset from PC makers like Acer, Asus, Dell, HP, Lenovo, or Samsung. The setup process just involves launching the Mixed Reality Portal app, and most modern PCs will be capable of running basic apps in Mixed Reality. You’ll need a more powerful machine to access some of the more demanding games and experiences.

Microsoft has created a Cliff House home area where you can pin apps, games, and even holograms. It’s the main portal for launching everything you’ll need in VR, and you can also watch movies and TV shows from there. Right now there aren’t too many games, but SteamVR support will be available in beta by the end of the year.

FLUENT DESIGN CHANGES

Microsoft is ushering in a new design language with Windows 10, dubbed Fluent Design. The Windows 10 Fall Creators Update introduces some parts of Fluent Design, with subtle effects and animations. Microsoft’s Fluent Design System is designed to be the true successor to Microsoft’s Metro design, and will appear across apps and services on Windows, iOS, and Android. Microsoft is focusing on light, depth, motion, material, and scale for its Fluent Design, with animations that make the design feel like it’s moving during interactions in Windows.

Most of the new changes include subtle additions like blur effects, which is a type of design we saw back with Windows Vista. The Windows 10 Fall Creators Update also makes it easier to resize apps and windows, thanks to the design changes, and transparency in the Start menu now uses a subtle new acrylic design.

MICROSOFT EDGE IMPROVEMENTS

Microsoft’s Edge browser is getting a lot of improvements in the Fall Creators Update. The software maker is bringing back pinned sites on the task bar, allowing you to pin your favorite site (The Verge) to the task bar for quick access. There’s also a new full-screen mode (F11) that lets you use most of your monitor to fully display a website fully. PDFs and EPUB ebooks are also getting some nice additions: you can now annotate ebooks, and even use ink with a stylus on them; PDFs are getting annotation support and improved viewing and navigation.

PEN AND TOUCH IMPROVEMENTS

If you’re a Microsoft Surface owner, then the Fall Creators Update will improve the touch and inking features. Microsoft has added a new touch keyboard with text prediction, and quicker access to emoji. There’s even a one-handed touch keyboard and shape writing so you can swipe over keys to type (just like Windows Phone). Microsoft has also added a dictation button so you can speak to type, or even use voice commands to navigate around Windows 10.

NEW EMOJI AND A USEFUL SHORTCUT

Everyone loves emoji and Microsoft is making sure it got the latest Unicode updates in Windows 10 Fall Creators Update. New additions include dinosaurs, genies, fairies, and even zombies in time for Halloween. They’re all available in a really neat new emoji panel. You can summon the emoji panel by using Win + period or semicolon as a keyboard shortcut. The panel also supports searching for emoji, so it’s the perfect way to quickly send that ideal response during a conversation.

CORTANA IMPROVEMENTS

Cortana will now display call notifications if you’re using an Android phone. The digital assistant will sync notifications if you have Cortana installed on an Android device, and it gives you the ability to text a person if you’re busy on your PC, or decline the call. Microsoft has also moved Cortana’s settings into the main settings part of Windows 10. Cortana can now even lock, sign out, shut down, or restart your PC with voice commands.

HEADPHONE AND SOUND IMPROVEMENTS

If you use headphones a lot with your Windows 10 PC, then they’ll be a lot easier to manage with the Fall Creators Update. You can now right-click on the sound icon in the notification area and enable Windows Sonic, a spatial sound feature that supports surround sound and Dolby Atmos. The new volume mixer also supports the ability to control individual app volume for Universal Windows Apps, which is useful if you want to play music from Groove Music or Microsoft Edge in the background at slightly lower than the system volume for gaming.

TASK MANAGER GPU TRACKING AND DPI IMPROVEMENTS

If you’re a PC gamer, then Microsoft is adding a nice addition for tracking GPU performance. Task Manager now has a new GPU option in the performance tab that shows GPU utilization and memory usage. Processes are also now grouped in the main Task Manager interface, making it easier to control them.

Microsoft is also addressing the issue of blurry apps when you use a monitor with a laptop, or a second screen. If you have a high DPI display like a 4K monitor, you’ll no longer have to log out to fix blurry desktop apps. It’s a good improvement that will fix most desktop apps and the majority of DPI complaints, but you might find some older apps will still run blurry at times.